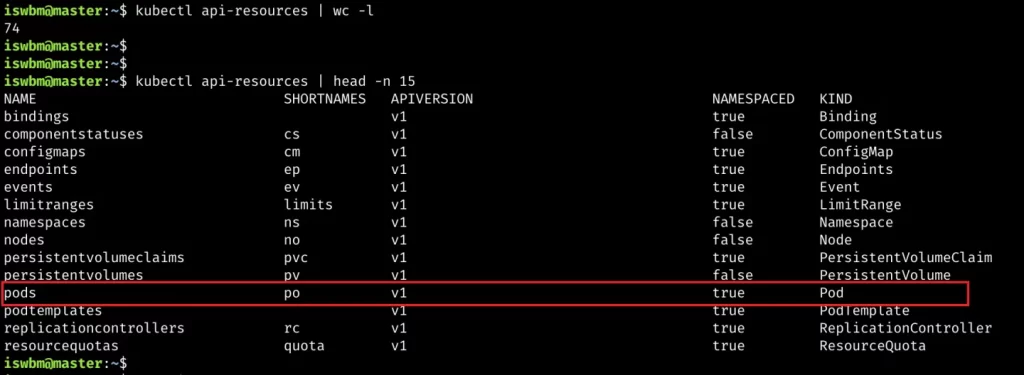
In the harsh reality of data systems, many things can go wrong:
The database software or hardware may fail at any time (including in the middle of a write operation).
The application may crash at any time (including halfway through a series of operations).
Interruptions in the network can unexpectedly cut off the application from the database, or one database node from another.
Several clients may write to the database at the same time, overwriting each other’s changes.
A client may read data that doesn’t make sense because it has only partially been updated.
Race conditions between clients can cause surprising bugs.In order to be reliable, a system has to deal with these faults and ensure that they don’t cause catastrophic failure of the entire system. However, implementing fault- tolerance mechanisms is a lot of work. It requires a lot of careful thinking about all the things that can go wrong, and a lot of testing to ensure that the solution actually works.
For decades, transactions have been the mechanism of choice for simplifying these issues. A transaction is a way for an application to group several reads and writes together into a logical unit. Conceptually, all the reads and writes in a transaction are executed as one operation: either the entire transaction succeeds (commit) or it fails (abort, rollback). If it fails, the application can safely retry. With transactions, error handling becomes much simpler for an application, because it doesn’t need to worry about partial failure—i.e., the case where some operations succeed and some fail (for whatever reason).
Transactions are not a law of nature; they were created with a purpose, namely to simplify the programming model for applications accessing a database. By using transactions, the application is free to ignore certain potential error scenarios and concurrency issues, because the database takes care of them instead (we call these safety guarantees).
Isolation levels and race conditions
Transactions are an abstraction layer that allows an application to pretend that cer‐ tain concurrency problems and certain kinds of hardware and software faults don’t exist. A large class of errors is reduced down to a simple transaction abort, and the application just needs to try again.
we went particularly deep into the topic of concurrency control. We discussed several widely used isolation levels, in particular
read committed,
snapshot isolation (sometimes called repeatable read), and
serializable.
We characterized those isolation levels by discussing various examples of race conditions:
Dirty reads(脏读,读未提交)
One client reads another client’s writes before they have been committed. The read committed isolation level and stronger levels prevent dirty reads.
Dirty writes(脏写)
One client overwrites data that another client has written, but not yet committed. Almost all transaction implementations prevent dirty writes.
Read skew (读偏差,又称nonrepeatable reads不可重复读)
A client sees different parts of the database at different points in time. This issue is most commonly prevented with snapshot isolation, which allows a transaction to read from a consistent snapshot at one point in time. It is usually implemented with multi-version concurrency control (MVCC).
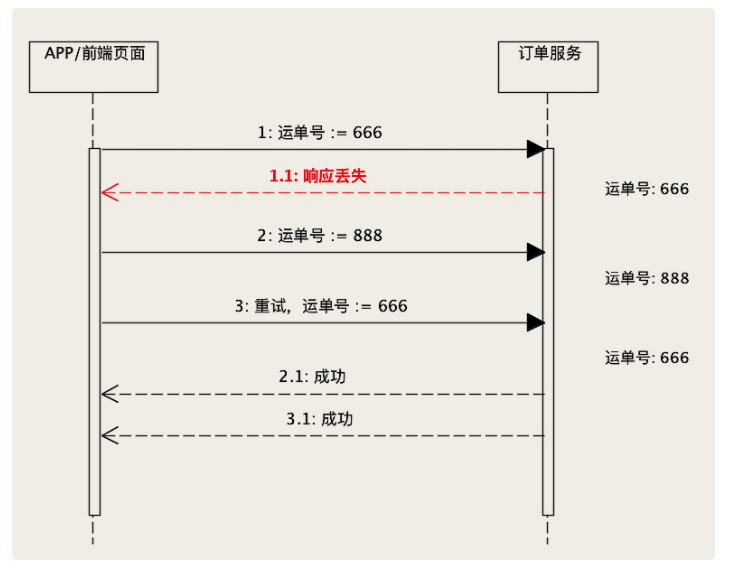
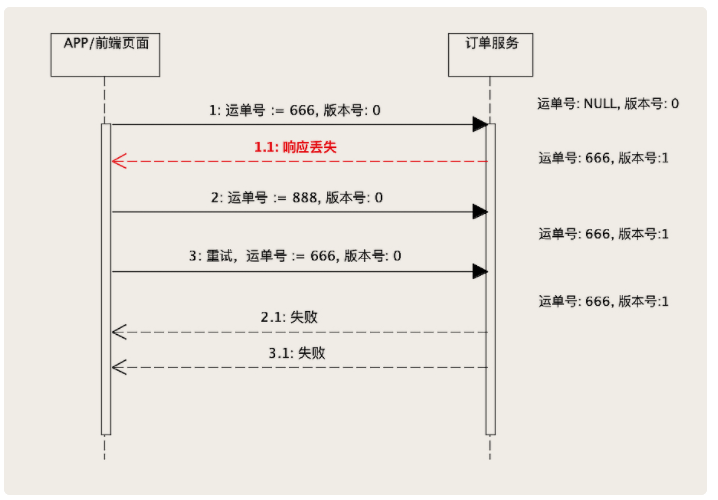
Lost updates(丢失更新)
Two clients concurrently perform a read-modify-write cycle. One overwrites the other’s write without incorporating its changes, so data is lost. Increased isolation level to ‘Repeatable Read’ so that database can perform efficient checks in conjunction, Optimistic/Pressmistic locking is the common method used to prevent lost update problems too.
Write skew(写偏差)
A transaction reads something, makes a decision based on the value it saw, and writes the decision to the database. However, by the time the write is made, the premise of the decision is no longer true. Only serializable isolation prevents this anomaly.
Phantom reads(幻读)
A transaction reads objects that match some search condition. Another client makes a write that affects the results of that search. Snapshot isolation prevents straightforward phantom reads, but phantoms in the context of write skew require special treatment, such as index-range locks.
Weak isolation levels protect against some of those anomalies but leave you, the application developer, to handle others manually (e.g., using explicit locking). Only serializable isolation protects against all of these issues.
Three different approaches to implementing serializable transactions:
1.Literally executing transactions in a serial order(串行执行事务)
If you can make each transaction very fast to execute, and the transaction throughput is low enough to process on a single CPU core, this is a simple and effective option.
2.Two-phase locking(两阶段锁)
For decades this has been the standard way of implementing serializability, but many applications avoid using it because of its performance characteristics.
3.Serializable snapshot isolation (SSI序列化快照隔离)
A fairly new algorithm that avoids most of the downsides of the previous approaches. It uses an optimistic approach, allowing transactions to proceed without blocking. When a transaction wants to commit, it is checked, and it is aborted if the execution was not serializable.
The examples in this chapter used a relational data model. However, as discussed in “The need for multi-object transactions”, transactions are a valuable database feature, no matter which data model is used.
In this chapter, we explored ideas and algorithms mostly in the context of a database running on a single machine. Transactions in distributed databases open a new set of difficult challenges, which we’ll discuss in the next two chapters.
Go scheduler’s job is to distribute runnable goroutines over multiple worker OS threads that runs on one or more processors. In multi-threaded computation, two paradigms have emerged in scheduling: work sharing and work stealing.
Work-sharing: When a processor generates new threads, it attempts to migrate some of them to the other processors with the hopes of them being utilized by the idle/underutilized processors.
Work-stealing: An underutilized processor actively looks for other processor’s threads and “steal” some.
The migration of threads occurs less frequently with work stealing than with work sharing. When all processors have work to run, no threads are being migrated. And as soon as there is an idle processor, migration is considered.
Go has a work-stealing scheduler since 1.1, contributed by Dmitry Vyukov. This article will go in depth explaining what work-stealing schedulers are and how Go implements one.
GOMAXPROCS
The Go scheduler uses a parameter called GOMAXPROCS to determine how many OS threads may be actively executing Go code simultaneously. Its default value is the number of CPUs on the machine, so on a machine with 8 CPUs, the scheduler will schedule Go code on up to 8 OS threads at once. (GOMAXPROCS is the n in m:n scheduling.) Goroutines that are sleeping or blocked in a communication do not need a thread at all. Goroutines that are blocked in I/O or other system calls or are calling non-Go functions, do need an OS thread, but GOMAXPROCS need not account for them.
Scheduling basics
Go has an M:N scheduler that can also utilize multiple processors. At any time, M goroutines need to be scheduled on N OS threads that runs on at most GOMAXPROCS numbers of processors. Go scheduler uses the following terminology for goroutines, threads and processors:
G: goroutine
M: OS thread (machine)
P: processor
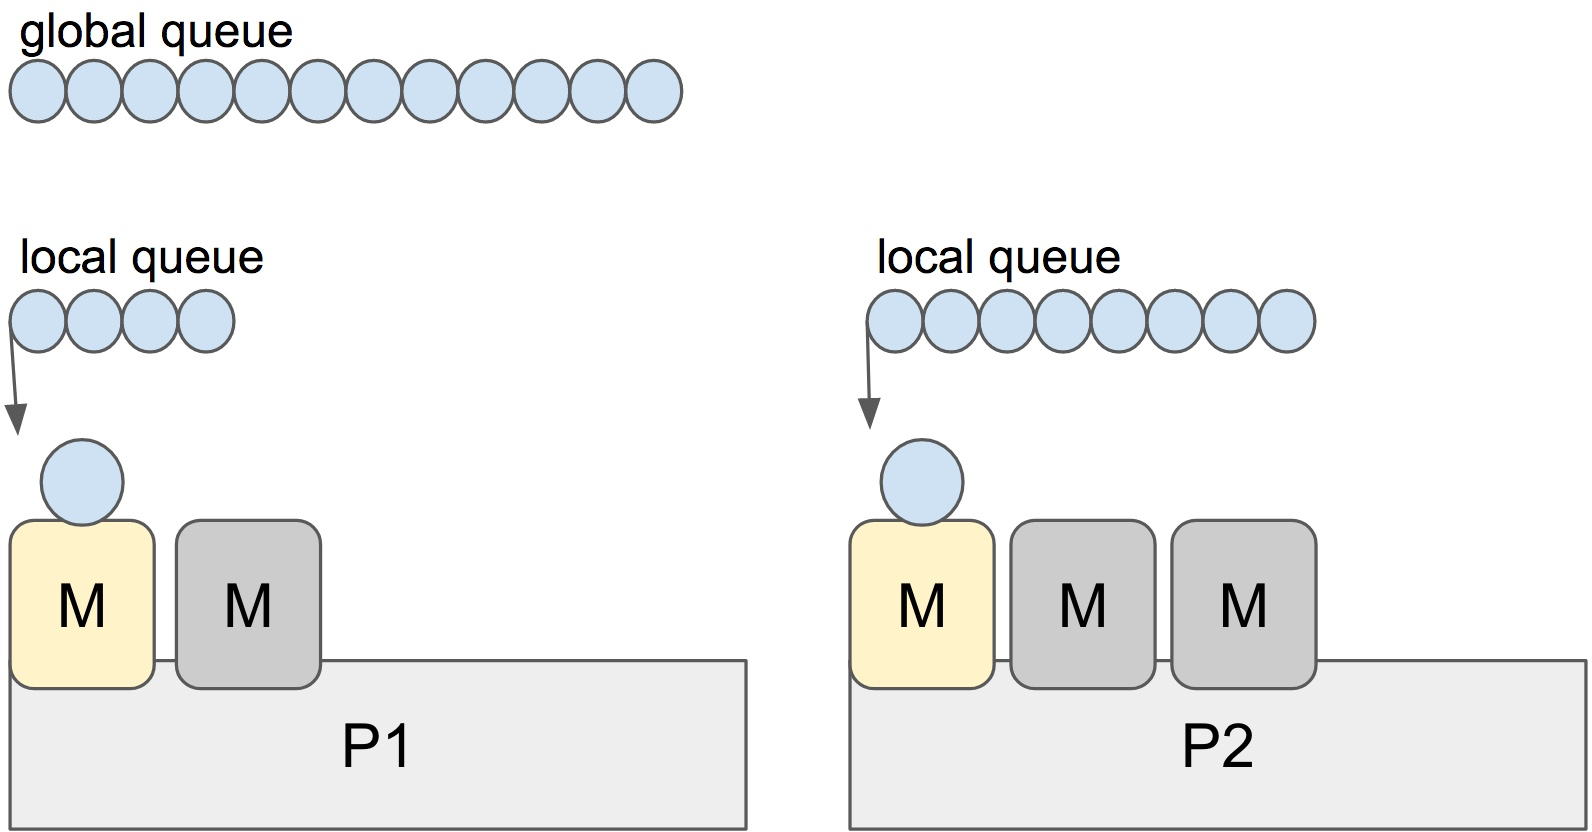
There is a P-specific local and a global goroutine queue. Each M should be assigned to a P. But Ps may have no Ms if they are blocked or in a system call. At any time, there are at most GOMAXPROCS number of P. At any time, only one M can run per P. More Ms can be created by the scheduler if required.
Each round of scheduling is simply finding a runnable goroutine and executing it. At each round of scheduling, the search happens in the following order:
runtime.schedule() {
    // only 1/61 of the time, check the global runnable queue for a G.
    // if not found, check the local queue.
    // if not found,
    //     try to steal from other Ps.
    //     if not, check the global runnable queue.
    //     if not found, poll network.
}
Once a runnable G is found, it is executed until it is blocked.
Note: It looks like the global queue has an advantage over the local queue but checking global queue once a while is crucial to avoid M is only scheduling from the local queue until there are no locally queued goroutines left.
Stealing
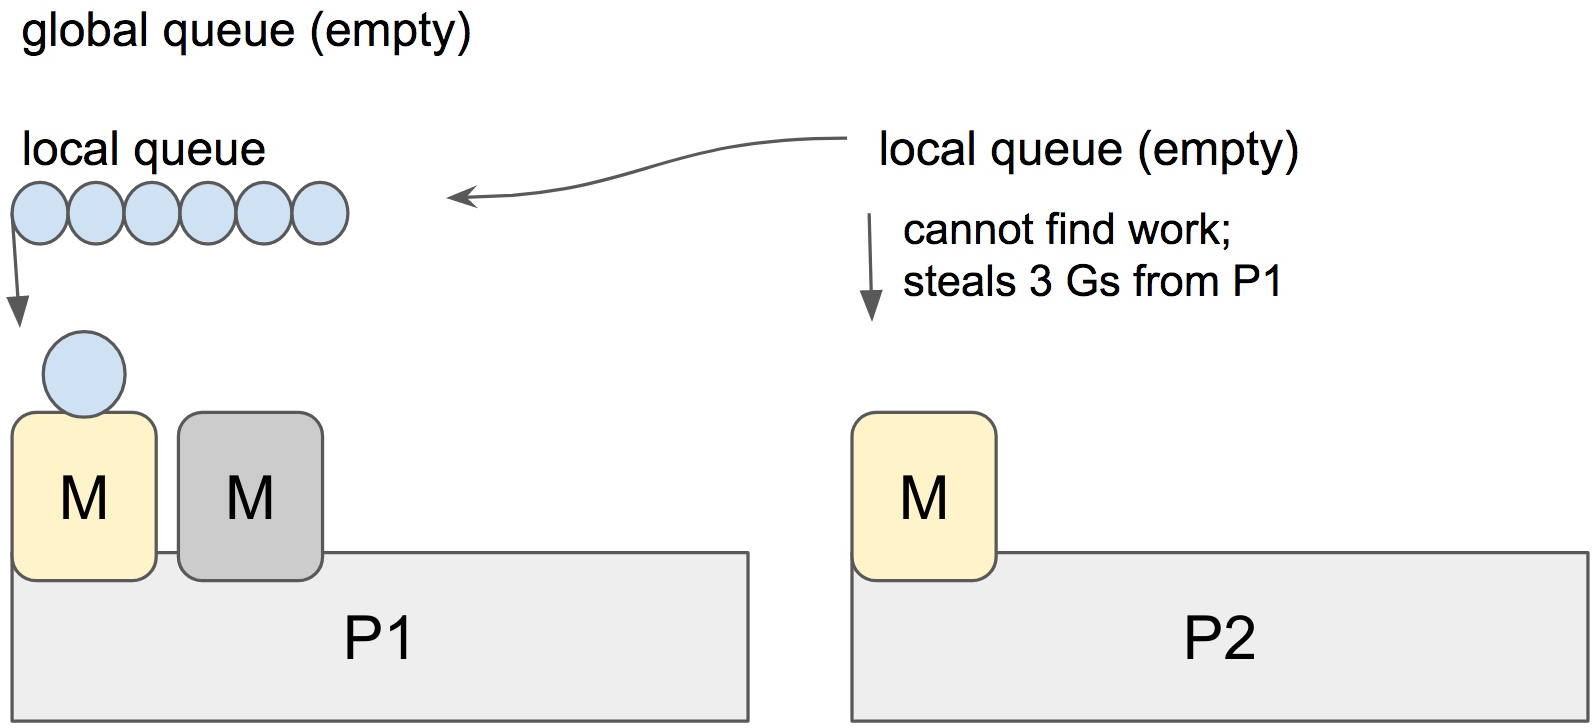
When a new G is created or an existing G becomes runnable, it is pushed onto a list of runnable goroutines of current P. When P finishes executing G, it tries to pop a G from own list of runnable goroutines. If it’s own list is now empty, P chooses a random other processor (P) and tries to steal a half of runnable goroutines from its queue.
In the case above, P2 cannot find any runnable goroutines. Therefore, it randomly picks another processor (P1) and steal three goroutines to its own local queue. P2 will be able to run these goroutines and scheduler work will be more fairly distributed between multiple processors.
Spinning threads
The scheduler always wants to distribute as much as runnable goroutines to Ms to utilize the processors but at the same time we need to park excessive work to conserve CPU and power. Contradictory to this, scheduler should also need to be able to scale to high-throughput and CPU intense programs.
Constant preemption is both expensive and is a problem for high-throughput programs if the performance is critical. OS threads shouldn’t frequently hand-off runnable goroutines between each other, because it leads to increased latency. Additional to that in the presence of syscalls, OS threads need to be constantly blocked and unblocked. This is costly and adds a lot of overhead.
In order to minimize the hand-off, Go scheduler implements “spinning threads”. Spinning threads consume a little extra CPU power but they minimize the preemption of the OS threads.
An M with a P assignment is looking for a runnable goroutine.一个绑定了P的M在查找可执行的goroutine。
An M without a P assignment is looking for available Ps.一个没有绑定P的M在查找可用的P。
Scheduler also unparks an additional thread and spins it when it is readying a goroutine if there is an idle P and there are no other spinning threads.如果有一个空闲的P并且没有其他正在自旋的线程,调度器在准备goroutine时也会唤醒一个额外的线程并进行自旋。
There are at most GOMAXPROCS spinning Ms at any time.
When a spinning thread finds work, it takes itself out of spinning state.
Idle threads with a P assignment don’t block if there are idle Ms without a P assignment. When new goroutines are created or an M is being blocked, scheduler ensures that there is at least one spinning M. This ensures that there are no runnable goroutines that can be otherwise running; and avoids excessive M blocking/unblocking.
Go scheduler does a lot to avoid excessive preemption of OS threads by scheduling them to the right(work-sharing) and underutilized processors by work-stealing, as well as implementing “spinning” threads to avoid high occurrence of blocked/unblocked transitions.
Scheduling events can be traced by the execution tracer. You can investigate what’s going on if you happen to believe you have poor processor utilization.
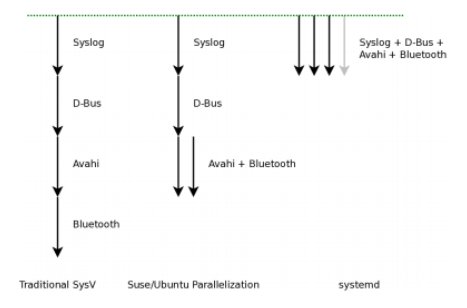
PID 1 这个进程非常特殊,其主要就任务是把整个操作系统带入可操作的状态。比如:启动 UI – Shell 以便进行人机交互,或者进入 X 图形窗口。传统上,PID 1 和传统的 Unix System V 相兼容的,所以也叫 sysvinit,这是使用得最悠久的 init 实现。Unix System V 于1983年 release。
Lennart 认为,实现上来说,upstart 其实是在管理一个逻辑上的服务依赖树,但是这个服务依赖树在表现形式上比较简单,你只需要配置——“启动 B好了就启动A”或是“停止了A后就停止B”这样的规则。但是,Lennart 说,这种简单其实是有害的(this simplification is actually detrimental)。他认为,
这个社区太病态了,全是 ass holes,你们不停用各种手段在各种地方用不同的语言和方式来侮辱和漫骂我。我还是一个年轻人,我从来没有经历过这样的场面,但是今天我已经对这种场面很熟悉了。我有时候说话可能不准确,但是我不会像他样那样说出那样的话,我也没有被这些事影响,因为我脸皮够厚,所以,为什么我可以在如何大的反对声面前让 systemd 成功,但是,你们 Linux 社区太可怕了。你们里面的有精神病的人太多了。另外,对于Linus Torvalds,你是这个社区的 Role Model,但可惜你是一个 Bad Role Model,你在社区里的刻薄和侮辱性的言行,基本从一定程度上鼓励了其它人跟你一样,当然,并不只是你一个人的问题,而是在你周围聚集了一群和你一样的这样干的人。送你一句话—— A fish rots from the head down !一条鱼是从头往下腐烂的……
我对 systemd 和 Lennart 的贴子没有什么强烈的想法。虽然,传统的 Unix 设计哲学—— “Do one thing and Do it well”,很不错,而且我们大多数人也实践了这么多年,但是这并不代表所有的真实世界。在历史上,也不只有systemd 这么干过。但是,我个人还是 old-fashioned 的人,至少我喜欢文本式的日志,而不是二进制的日志。但是 systemd 没有必要一定要有这样的品味。哦,我说细节了……
今天,systemd 占据了几乎所有的主流的 Linux 发行版的默认配置,包括:Arch Linux、CentOS、CoreOS、Debian、Fedora、Megeia、OpenSUSE、RHEL、SUSE企业版和 Ubuntu。而且,对于 CentOS, CoreOS, Fedora, RHEL, SUSE这些发行版来说,不能没有 systemd。(Ubuntu 还有一个不错的wiki – Systemd for Upstart Users 阐述了如何在两者间切换)
func Reduce(arr []string, fn func(s string) int) int {
    sum := 0
    for _, it := range arr {
        sum += fn(it)
    }
    return sum
}

var list = []string{"Hao", "Chen", "MegaEase"}

x := Reduce(list, func(s string) int {
    return len(s)
})
fmt.Printf("%v\n", x)
// 15
Filter:
func Filter(arr []int, fn func(n int) bool) []int {
    var newArray = []int{}
    for _, it := range arr {
        if fn(it) {
            newArray = append(newArray, it)
        }
    }
    return newArray
}

var intset = []int{1, 2, 3, 4, 5, 6, 7, 8, 9, 10}
out := Filter(intset, func(n int) bool {
   return n%2 == 1
})
fmt.Printf("%v\n", out)

out = Filter(intset, func(n int) bool {
    return n > 5
})
fmt.Printf("%v\n", out)
type Employee struct {
    Name     string
    Age      int
    Vacation int
    Salary   int
}

var list = []Employee{
    {"Hao", 44, 0, 8000},
    {"Bob", 34, 10, 5000},
    {"Alice", 23, 5, 9000},
    {"Jack", 26, 0, 4000},
    {"Tom", 48, 9, 7500},
    {"Marry", 29, 0, 6000},
    {"Mike", 32, 8, 4000},
}
然后,我们有如下的几个函数:
func EmployeeCountIf(list []Employee, fn func(e *Employee) bool) int {
    count := 0
    for i, _ := range list {
        if fn(&list[i]) {
            count += 1
        }
    }
    return count
}

func EmployeeFilterIn(list []Employee, fn func(e *Employee) bool) []Employee {
    var newList []Employee
    for i, _ := range list {
        if fn(&list[i]) {
            newList = append(newList, list[i])
        }
    }
    return newList
}

func EmployeeSumIf(list []Employee, fn func(e *Employee) int) int {
    var sum = 0
    for i, _ := range list {
        sum += fn(&list[i])
    }
    return sum
}
func Transform(slice, function interface{}) interface{} {
  return transform(slice, function, false)
}

func TransformInPlace(slice, function interface{}) interface{} {
  return transform(slice, function, true)
}

func transform(slice, function interface{}, inPlace bool) interface{} {

  //check the <code data-enlighter-language="raw" class="EnlighterJSRAW">slice</code> type is Slice
  sliceInType := reflect.ValueOf(slice)
  if sliceInType.Kind() != reflect.Slice {
    panic("transform: not slice")
  }

  //check the function signature
  fn := reflect.ValueOf(function)
  elemType := sliceInType.Type().Elem()
  if !verifyFuncSignature(fn, elemType, nil) {
    panic("trasform: function must be of type func(" + sliceInType.Type().Elem().String() + ") outputElemType")
  }

  sliceOutType := sliceInType
  if !inPlace {
    sliceOutType = reflect.MakeSlice(reflect.SliceOf(fn.Type().Out(0)), sliceInType.Len(), sliceInType.Len())
  }
  for i := 0; i < sliceInType.Len(); i++ {
    sliceOutType.Index(i).Set(fn.Call([]reflect.Value{sliceInType.Index(i)})[0])
  }
  return sliceOutType.Interface()

}

func verifyFuncSignature(fn reflect.Value, types ...reflect.Type) bool {

  //Check it is a funciton
  if fn.Kind() != reflect.Func {
    return false
  }
  // NumIn() - returns a function type's input parameter count.
  // NumOut() - returns a function type's output parameter count.
  if (fn.Type().NumIn() != len(types)-1) || (fn.Type().NumOut() != 1) {
    return false
  }
  // In() - returns the type of a function type's i'th input parameter.
  for i := 0; i < len(types)-1; i++ {
    if fn.Type().In(i) != types[i] {
      return false
    }
  }
  // Out() - returns the type of a function type's i'th output parameter.
  outType := types[len(types)-1]
  if outType != nil && fn.Type().Out(0) != outType {
    return false
  }
  return true
}
上面的代码一下子就复杂起来了,可见,复杂的代码都是在处理异常的地方。我不打算Walk through 所有的代码,别看代码多,但是还是可以读懂的,下面列几个代码中的要点:
代码中没有使用Map函数,因为和数据结构和关键有含义冲突的问题,所以使用Transform,这个来源于 C++ STL库中的命名。
func Reduce(slice, pairFunc, zero interface{}) interface{} {
  sliceInType := reflect.ValueOf(slice)
  if sliceInType.Kind() != reflect.Slice {
    panic("reduce: wrong type, not slice")
  }

  len := sliceInType.Len()
  if len == 0 {
    return zero
  } else if len == 1 {
    return sliceInType.Index(0)
  }

  elemType := sliceInType.Type().Elem()
  fn := reflect.ValueOf(pairFunc)
  if !verifyFuncSignature(fn, elemType, elemType, elemType) {
    t := elemType.String()
    panic("reduce: function must be of type func(" + t + ", " + t + ") " + t)
  }

  var ins [2]reflect.Value
  ins[0] = sliceInType.Index(0)
  ins[1] = sliceInType.Index(1)
  out := fn.Call(ins[:])[0]

  for i := 2; i < len; i++ {
    ins[0] = out
    ins[1] = sliceInType.Index(i)
    out = fn.Call(ins[:])[0]
  }
  return out.Interface()
}
泛型版的 Filter 代码如下:
func Filter(slice, function interface{}) interface{} {
  result, _ := filter(slice, function, false)
  return result
}

func FilterInPlace(slicePtr, function interface{}) {
  in := reflect.ValueOf(slicePtr)
  if in.Kind() != reflect.Ptr {
    panic("FilterInPlace: wrong type, " +
      "not a pointer to slice")
  }
  _, n := filter(in.Elem().Interface(), function, true)
  in.Elem().SetLen(n)
}

var boolType = reflect.ValueOf(true).Type()

func filter(slice, function interface{}, inPlace bool) (interface{}, int) {

  sliceInType := reflect.ValueOf(slice)
  if sliceInType.Kind() != reflect.Slice {
    panic("filter: wrong type, not a slice")
  }

  fn := reflect.ValueOf(function)
  elemType := sliceInType.Type().Elem()
  if !verifyFuncSignature(fn, elemType, boolType) {
    panic("filter: function must be of type func(" + elemType.String() + ") bool")
  }

  var which []int
  for i := 0; i < sliceInType.Len(); i++ {
    if fn.Call([]reflect.Value{sliceInType.Index(i)})[0].Bool() {
      which = append(which, i)
    }
  }

  out := sliceInType

  if !inPlace {
    out = reflect.MakeSlice(sliceInType.Type(), len(which), len(which))
  }
  for i := range which {
    out.Index(i).Set(sliceInType.Index(which[i]))
  }

  return out.Interface(), len(which)
}
func main() {
  c := Circle{10}
  r :=  Rectangle{100, 200}
  shapes := []Shape{c, r}

  for _, s := range shapes {
    s.accept(JsonVisitor)
    s.accept(XmlVisitor)
  }

}
type LogVisitor struct {
  visitor Visitor
}

func (v LogVisitor) Visit(fn VisitorFunc) error {
  return v.visitor.Visit(func(info *Info, err error) error {
    fmt.Println("LogVisitor() before call function")
    err = fn(info, err)
    fmt.Println("LogVisitor() after call function")
    return err
  })
}
Name Visitor
这个Visitor 主要是用来访问 Info 结构中的 Name 和 NameSpace 成员
type NameVisitor struct {
  visitor Visitor
}

func (v NameVisitor) Visit(fn VisitorFunc) error {
  return v.visitor.Visit(func(info *Info, err error) error {
    fmt.Println("NameVisitor() before call function")
    err = fn(info, err)
    if err == nil {
      fmt.Printf("==> Name=%s, NameSpace=%s\n", info.Name, info.Namespace)
    }
    fmt.Println("NameVisitor() after call function")
    return err
  })
}
使用:
func main() {
  info := Info{}
  var v Visitor = &info
  v = LogVisitor{v}
  v = NameVisitor{v}
  v = OtherThingsVisitor{v}

  loadFile := func(info *Info, err error) error {
    info.Name = "Hao Chen"
    info.Namespace = "MegaEase"
    info.OtherThings = "We are running as remote team."
    return nil
  }
  v.Visit(loadFile)
}
上面的代码,我们可以看到
Visitor们一层套一层
我用 loadFile 假装从文件中读如数据
最后一条 v.Visit(loadfile) 我们上面的代码就全部开始激活工作了。
上面的代码输出如下的信息,你可以看到代码的执行顺序是怎么执行起来了
LogVisitor() before call function
NameVisitor() before call function
OtherThingsVisitor() before call function
==> OtherThings=We are running as remote team.
OtherThingsVisitor() after call function
==> Name=Hao Chen, NameSpace=MegaEase
NameVisitor() after call function
LogVisitor() after call function
上面的代码有以下几种功效:
解耦了数据和程序。
使用了修饰器模式
还做出来pipeline的模式
用修饰器模式重构以上代码
type VisitorFunc func(*Info, error) error

type Visitor interface {
	Visit(VisitorFunc) error
}

type Info struct {
	Namespace   string
	Name        string
	OtherThings string
}

func (info *Info) Visit(fn VisitorFunc) error {
	fmt.Println("Info Visit()")
	return fn(info, nil)
}

func NameVisitor(info *Info, err error) error {
	fmt.Println("NameVisitor() before call function")
	fmt.Printf("==> Name=%s, NameSpace=%s\n", info.Name, info.Namespace)
	return err
}

func LogVisitor(info *Info, err error) error {
	fmt.Println("LogVisitor() before call function")
	return err
}

func OtherVisitor(info *Info, err error) error {
	fmt.Println("OtherThingsVisitor() before call function")
	return err
}

type DecoratedVisitor struct {
	visitor    Visitor
	decorators []VisitorFunc
}

func NewDecoratedVisitor(v Visitor, fn ...VisitorFunc) Visitor {
	if len(fn) == 0 {
		return v
	}
	return DecoratedVisitor{v, fn}
}

func (v DecoratedVisitor) Visit(fn VisitorFunc) error {
	fmt.Println("DecoratedVisitor Visit()")
	return v.visitor.Visit(func(info *Info, err error) error {
		fmt.Println("DecoratedVisitor v.visitor.Visit()")
		if err != nil {
			return err
		}
		if err := fn(info, nil); err != nil {
			return err
		}
		for i := range v.decorators {
			if err := v.decorators[i](info, nil); err != nil {
				return err
			}
		}
		return nil
	})
}
运行:
func main() {
	info := Info{}
	var v Visitor = &info
	v = NewDecoratedVisitor(v, LogVisitor, NameVisitor, OtherVisitor)//函数式编程

	loadFile := func(info *Info, err error) error {
		fmt.Println("loadFile()")
		info.Name = "Hao Chen"
		info.Namespace = "MegaEase"
		info.OtherThings = "We are running as remote team."
		return nil
	}

	v.Visit(loadFile)
}
int steps = 64 * 1024 * 1024;
// Arbitrary number of steps
int lengthMod = arr.Length - 1;
for (int i = 0; i < steps; i++)
{
    arr[(i * 16) & lengthMod]++; // (x & lengthMod) is equal to (x % arr.Length)
}
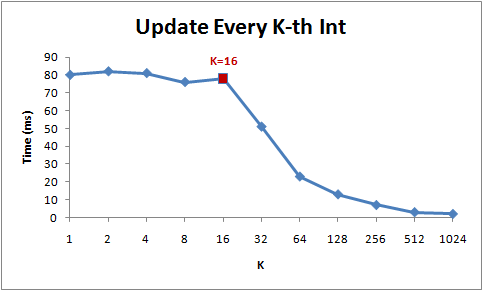
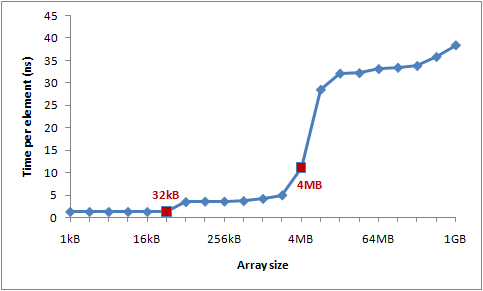
下图是运行时间图表:
你可以看到在32KB和4MB之后性能明显滑落——正好是我机器上L1和L2缓存大小。
示例4:指令级别并发
现在让我们看一看不同的东西。下面两个循环中你以为哪个较快?
int steps = 256 * 1024 * 1024;
int[] a = new int[2];

// Loop 1
for (int i=0; i<steps; i++) { a[0]++; a[0]++; }

// Loop 2
for (int i=0; i<steps; i++) { a[0]++; a[1]++; }
public static long UpdateEveryKthByte(byte[] arr, int K)
{
    Stopwatch sw = Stopwatch.StartNew();
    const int rep = 1024*1024; // Number of iterations – arbitrary
    int p = 0;
    for (int i = 0; i < rep; i++)
    {
        arr[p]++;
        p += K;
        if (p >= arr.Length) p = 0;
    }
    sw.Stop();
    return sw.ElapsedMilliseconds;
}