:mannotop Golang – 第 2 页 – manno的博客

分类: Golang

Go 内存管理-垃圾回收器

source article

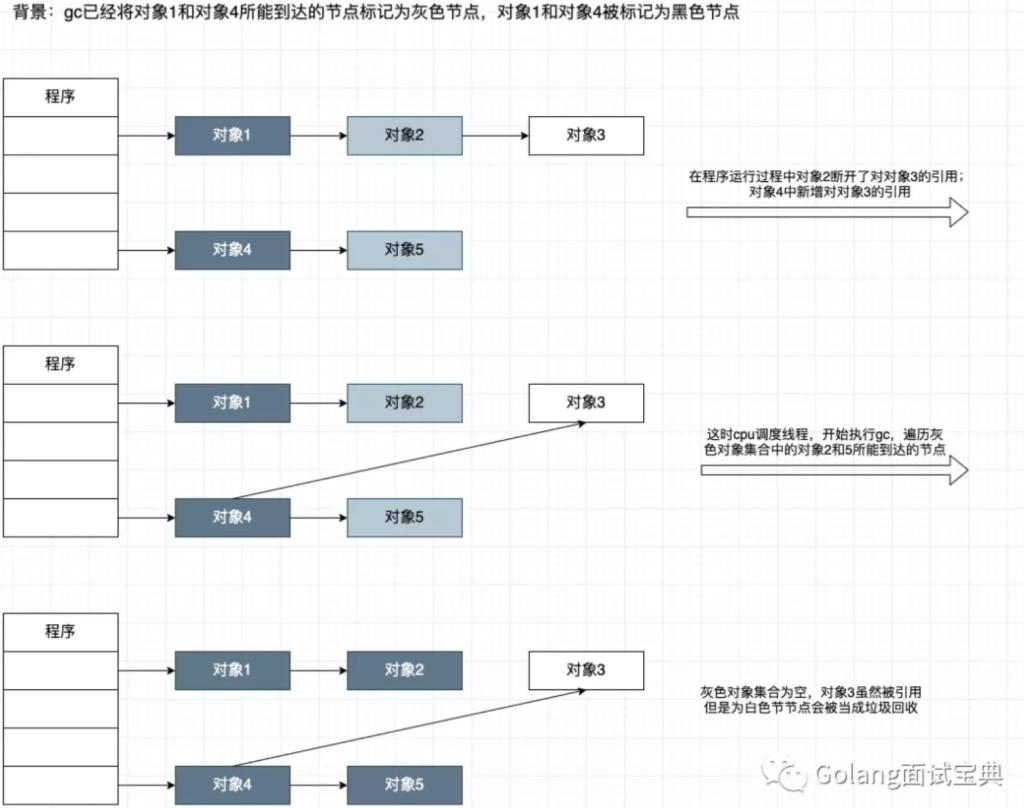
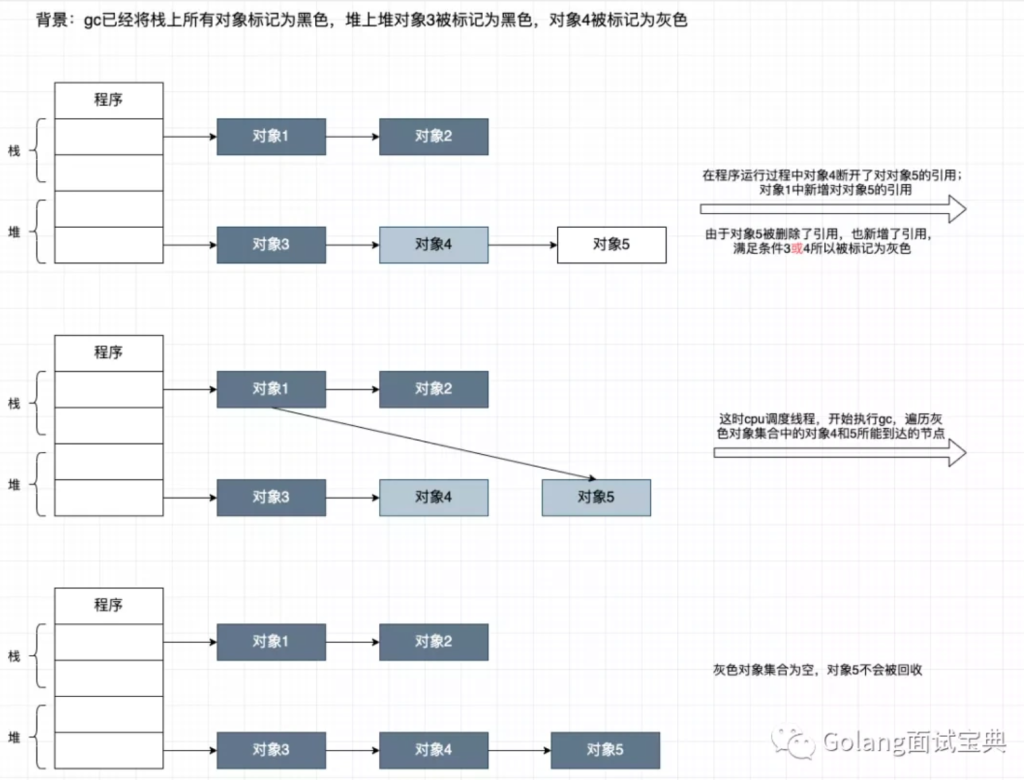
The Go garbage collector is responsible for collecting the memory that is not in use anymore. The implemented algorithm is a concurrent tri-color mark and sweep collector. In this article, we will see in detail the marking phase, along with the usage of the different colors.

Go1.3 标记清除法

分下面四步进行

  1. 进行 STW(stop the world 即暂停程序业务逻辑),然后从 main 函数开始找到不可达的内存占用和可达的内存占用
  2. 开始标记,程序找出可达内存占用并做标记
  3. 标记结束清除未标记的内存占用
  4. 结束 STW 停止暂停,让程序继续运行,循环该过程直到 main 生命周期结束

一开始的做法是将垃圾清理结束时才停止 STW,后来优化了方案将清理垃圾放到了 STW 之后,与程序运行同时进行,这样做减小了 STW 的时长。但是 STW 会暂停用户逻辑对程序的性能影响是非常大的,这种粒度的 STW 对于性能较高的程序还是无法接受,因此 Go1.5 采用了三色标记法优化了 STW。

Go1.5 三色标记法

三色标记算法将程序中的对象分成白色、黑色和灰色三类。

白色对象表示暂无对象引用的潜在垃圾,其内存可能会被垃圾收集器回收;

灰色对象表示活跃的对象,黑色到白色的中间状态,因为存在指向白色对象的外部指针,垃圾收集器会扫描这些对象的子对象;

黑色对象表示活跃的对象,包括不存在引用外部指针的对象以及从根对象可达的对象。

三色标记法分五步进行

  1. 将所有对象标记为白色
  2. 从根节点集合出发,将第一次遍历到的节点标记为灰色放入集合列表中
  3. 遍历灰色集合,将灰色节点遍历到的白色节点标记为灰色,并把灰色节点标记为黑色
  4. 循环这个过程
  5. 直到灰色节点集合为空,回收所有的白色节点

这种方法看似很好,但是将 GC 和程序是一起执行的,程序执行过程中可能会更改白色对象的引用关系,导致出现下面这种情况,被引用的对象 3 受到错误的垃圾回收,程序从而出现错误。

因此在此基础上拓展出了俩种方法,强三色不变式和弱三色不变式

  • 强三色不变式:不允许黑色对象引用白色对象
  • 弱三色不变式:黑色对象可以引用白色,白色对象存在其他灰色对象对他的引用,或者他的链路上存在灰色对象

为了实现这俩种不变式的设计思想,从而引出了屏障机制,即在程序的执行过程中加一个判断机制,满足判断机制则执行回调函数。

屏障机制分为插入屏障和删除屏障,插入屏障实现的是强三色不变式,删除屏障则实现了弱三色不变式。值得注意的是为了保证栈的运行效率,屏障只对堆上的内存对象启用,栈上的内存会在 GC 结束后启用 STW 重新扫描。

  • 插入屏障:对象被引用时触发的机制,当白色对象被黑色对象引用时,白色对象被标记为灰色
  • 删除屏障:对象被删除时触发的机制。如果灰色对象引用的白色对象被删除时,那么白色对象会被标记为灰色。(缺点:这种做法回收精度较低,一个对象即使被删除仍可以活过这一轮再下一轮被回收)

上面的屏障保护只发生在堆的对象上。因为性能考虑,栈上的引用改变不会引起屏障触发。

所以栈在 GC 迭代结束时(没有灰色节点),会对栈执行 STW,重新进行扫描清除白色节点。(STW 时间为 10-100ms)

Go1.8 三色标记 + 混合写屏障

基于插入写屏障和删除写屏障在结束时需要 STW 来重新扫描栈,所带来的性能瓶颈,Go 在 1.8 引入了混合写屏障的方式实现了弱三色不变式的设计方式,混合写屏障分下面四步

GC 开始时直接将栈上可达对象全部标记为黑色(不需要二次扫描,无需 STW)

GC 期间,任何栈上创建的新对象均为黑色

被删除引用的对象标记为灰色(无需判断是否被引用)

被添加引用的对象标记为灰色(无需判断是否被引用)

下面为混合写屏障过程

其它

GC的触发时机

触发 GC 有俩个条件,一是堆内存的分配达到控制器计算的触发堆大小,初始大小环境变量 GOGC,之后堆内存达到上一次垃圾收集的 2 倍时才会触发 GC。二是如果一定时间内没有触发,就会触发新的循环,该触发条件由 runtime.forcegcperiod 变量控制,默认为 2 分钟。

Go 内存管理

程序在内存上被分为堆区、栈区、全局数据区、代码段、数据区五个部分。对于 C++ 等早期编程语言栈上的内存由编译器管理回收,堆上的内存空间需要编程人员负责申请与释放。在 Go 中栈上内存仍由编译器负责管理回收,而堆上的内存由编译器和垃圾收集器负责管理回收,给编程人员带来了极大的便利性。

Go语言指针性能

原文链接

引言

本文主要想整理Go语言中值传递和指针传递本质上的区别,这里首席分享William Kennedy的一句话作为总结:

Value semantics keep values on the stack, which reduces pressure on the Garbage Collector (GC). However, value semantics require various copies of any given value to be stored, tracked and maintained. Pointer semantics place values on the heap, which can put pressure on the GC. However, pointer semantics are efficient because only one value needs to be stored, tracked and maintained.

大意可以理解为Golang中,值对象是存储在stack栈内存中的,指针对象是存储在heap堆内存中的,故使用值对象可以减少GC的压力。然而,指针传递的效率在于,存储、跟踪和维护过程中只需要传递一个值。

基于以上的认识,我们用以下例子来试试

结构体定义

以下面一个简单的struct作为示例

type S struct {
   a, b, c int64
   d, e, f string
   g, h, i float64
}

我们分别构建初始化值对象和指针对象的方法

func byValue() S {
   return S{
      a: math.MinInt64, b: math.MinInt64, c: math.MinInt64,
      d: "foo", e: "foo", f: "foo",
      g: math.MaxFloat64, h: math.MaxFloat64, i: math.MaxFloat64,
   }
}

func byPoint() *S {
   return &S{
      a: math.MinInt64, b: math.MinInt64, c: math.MinInt64,
      d: "foo", e: "foo", f: "foo",
      g: math.MaxFloat64, h: math.MaxFloat64, i: math.MaxFloat64,
   }
}

对象传递

内存地址

首先我们来探究在不同的function传递时,值对象和指针对象在内存地址方面有什么不同。我们创建两个function如下:

func TestValueAddress(t *testing.T) {
   nest1 := func() S {
      nest2 := func() S {
         s := byValue()
         fmt.Println("------ nest2 ------")
         fmt.Printf("&a:%v,  &b:%v, &c:%v, &d:%v, &f:%v, &g:%v, &h:%v, &i: %v\n",
            &s.a, &s.b, &s.c, &s.d, &s.f, &s.g, &s.h, &s.i)
         return s
      }
      s := nest2()
      fmt.Println("------ nest1 ------")
      fmt.Printf("&a:%v,  &b:%v, &c:%v, &d:%v, &f:%v, &g:%v, &h:%v, &i: %v\n",
         &s.a, &s.b, &s.c, &s.d, &s.f, &s.g, &s.h, &s.i)
      return s
   }
   s := nest1()
   fmt.Println("------ main ------")
   fmt.Printf("&a:%v,  &b:%v, &c:%v, &d:%v, &f:%v, &g:%v, &h:%v, &i: %v\n",
      &s.a, &s.b, &s.c, &s.d, &s.f, &s.g, &s.h, &s.i)
}

func TestPointAddress(t *testing.T) {
   nest1 := func() *S {
      nest2 := func() *S {
         s := byPoint()
         fmt.Println("------ nest2 ------")
         fmt.Printf("&a:%v,  &b:%v, &c:%v, &d:%v, &f:%v, &g:%v, &h:%v, &i: %v\n",
            &s.a, &s.b, &s.c, &s.d, &s.f, &s.g, &s.h, &s.i)
         return s
      }
      s := nest2()
      fmt.Println("------ nest1 ------")
      fmt.Printf("&a:%v,  &b:%v, &c:%v, &d:%v, &f:%v, &g:%v, &h:%v, &i: %v\n",
         &s.a, &s.b, &s.c, &s.d, &s.f, &s.g, &s.h, &s.i)
      return s
   }
   s := nest1()
   fmt.Println("------ main ------")
   fmt.Printf("&a:%v,  &b:%v, &c:%v, &d:%v, &f:%v, &g:%v, &h:%v, &i: %v\n",
      &s.a, &s.b, &s.c, &s.d, &s.f, &s.g, &s.h, &s.i)
}

两个方法对应的输入如下:

// TestValueAddress输出
------ nest2 ------
&a:0xc00007e2a0,  &b:0xc00007e2a8, &c:0xc00007e2b0, &d:0xc00007e2b8, &f:0xc00007e2d8, &g:0xc00007e2e8, &h:0xc00007e2f0, &i: 0xc00007e2f8
------ nest1 ------
&a:0xc00007e240,  &b:0xc00007e248, &c:0xc00007e250, &d:0xc00007e258, &f:0xc00007e278, &g:0xc00007e288, &h:0xc00007e290, &i: 0xc00007e298
------ main ------
&a:0xc00007e1e0,  &b:0xc00007e1e8, &c:0xc00007e1f0, &d:0xc00007e1f8, &f:0xc00007e218, &g:0xc00007e228, &h:0xc00007e230, &i: 0xc00007e238

// TestPointAddress输出
------ nest2 ------
&a:0xc00007e1e0,  &b:0xc00007e1e8, &c:0xc00007e1f0, &d:0xc00007e1f8, &f:0xc00007e218, &g:0xc00007e228, &h:0xc00007e230, &i: 0xc00007e238
------ nest1 ------
&a:0xc00007e1e0,  &b:0xc00007e1e8, &c:0xc00007e1f0, &d:0xc00007e1f8, &f:0xc00007e218, &g:0xc00007e228, &h:0xc00007e230, &i: 0xc00007e238
------ main ------
&a:0xc00007e1e0,  &b:0xc00007e1e8, &c:0xc00007e1f0, &d:0xc00007e1f8, &f:0xc00007e218, &g:0xc00007e228, &h:0xc00007e230, &i: 0xc00007e238

由此我们可知,值对象由于是分配在栈内存上的,所以他的生命周期跟随func:当function执行完毕时,对应function内部的对象也会被销毁被重新copy到新的栈内存;指针对象由于是分配在堆内存中的,即便function执行完毕,栈内存被清理也不会改变其分配的内存地址,而是由GC统一管理。

故值对象在不同的func中传递时,势必会引起栈内存中的copy

性能

然后让我们来看,仅在一个func中,值对象和指针对象的性能如何。

通过创建Benchmark以追踪他在循环中的性能:

func BenchmarkValueCopy(b *testing.B) {
   var s S
   out, _ := os.Create("value.out")
   _ = trace.Start(out)

   for i := 0; i < b.N; i++ {
      s = byValue()
   }

   trace.Stop()
   b.StopTimer()
   _ = fmt.Sprintf("%v", s.a)
}

func BenchmarkPointCopy(b *testing.B) {
   var s *S
   out, _ := os.Create("point.out")
   _ = trace.Start(out)

   for i := 0; i < b.N; i++ {
      s = byPoint()
   }

   trace.Stop()
   b.StopTimer()
   _ = fmt.Sprintf("%v", s.a)
}

然后执行以下语句

go test -bench=BenchmarkValueCopy -benchmem -run=^$ -count=10 > value.txt
go test -bench=BenchmarkPointCopy -benchmem -run=^$ -count=10 > point.txt

benchmark stat如下:

// value.txt
BenchmarkValueCopy-8       225915150           5.287 ns/op          0 B/op         0 allocs/op
BenchmarkValueCopy-8       225969075           5.348 ns/op          0 B/op         0 allocs/op
BenchmarkValueCopy-8       224717500           5.441 ns/op          0 B/op         0 allocs/op
...

// point.txt
BenchmarkPointCopy-8       22525324           47.25 ns/op          96 B/op         1 allocs/op
BenchmarkPointCopy-8       25844391           46.27 ns/op          96 B/op         1 allocs/op
BenchmarkPointCopy-8       25628395           46.02 ns/op          96 B/op         1 allocs/op
...

由此可以看出,值对象的初始化比指针对象初始化要快

然后我们通过trace日志来看看具体的原因,使用以下命令:

go tool trace value.out
go tool trace point.out

value.png value.out

point.png point.out

经过trace日志可以看出,值对象在执行过程中没有GC且没有额外的goroutines;指针对象总共GC 967次。

方法执行

创建基于值对象和指针对象的空function如下:

func (s S) value(s1 S) {}

func (s *S) point(s1 *S) {}

对应的Benchmark如下:

func BenchmarkValueFunction(b *testing.B) {
   var s S
   var s1 S

   s = byValue()
   s1 = byValue()
   for i := 0; i < b.N; i++ {
      for j := 0; j < 1000000; j++  {
         s.value(s1)
      }
   }
}

func BenchmarkPointFunction(b *testing.B) {
   var s *S
   var s1 *S

   s = byPoint()
   s1 = byPoint()
   for i := 0; i < b.N; i++ {
      for j := 0; j < 1000000; j++  {
         s.point(s1)
      }
   }
}

Benchmark stat如下:

// value
BenchmarkValueFunction-8            160      7339292 ns/op

// point
BenchmarkPointFunction-8            480      2520106 ns/op

由此可以看到,在方法执行过程中,指针对象是优于值对象的。

数组

下面我们尝试构建一个值对象数组和指针对象数组,即[]S和[]*S

func BenchmarkValueArray(b *testing.B) {
   var s []S
   out, _ := os.Create("value_array.out")
   _ = trace.Start(out)

   for i := 0; i < b.N; i++ {
      for j := 0; j < 1000000; j++ {
         s = append(s, byValue())
      }
   }

   trace.Stop()
   b.StopTimer()
}

func BenchmarkPointArray(b *testing.B) {
   var s []*S
   out, _ := os.Create("point_array.out")
   _ = trace.Start(out)

   for i := 0; i < b.N; i++ {
      for j := 0; j < 1000000; j++ {
         s = append(s, byPoint())
      }
   }

   trace.Stop()
   b.StopTimer()
}

获取到的benchmark stat如下

// value array   []S
BenchmarkValueArray-8             2    542506184 ns/op   516467388 B/op       83 allocs/op
BenchmarkValueArray-8             2    532587916 ns/op   516469084 B/op       85 allocs/op
BenchmarkValueArray-8             3    501410289 ns/op   538334434 B/op       57 allocs/op

// point array   []*S
BenchmarkPointArray-8             8    232675024 ns/op   145332278 B/op  1000022 allocs/op
BenchmarkPointArray-8            10    181305981 ns/op   145321713 B/op  1000018 allocs/op
BenchmarkPointArray-8             8    329801938 ns/op   145331643 B/op  1000021 allocs/op

然后是用trace日志看看具体的GC和Goroutines的情况:

go tool trace value_array.out
go tool trace point_array.out

value_array.png value_array.out

point_array.png point_array.out

通过以上的日志可知,[]S相较于[]*S仍然有更少的GC和Goroutines,但是在实际的运行速度中,尤其是需要值传递的情况,[]*S还是优于[]S的。此外,在使用[]S修改其中某一项的值的时候会存在问题,如下

// bad case
func TestValueArrayChange(t *testing.T) {
   var s []S
   for i := 0; i < 10; i++ {
      s = append(s, byValue())
   }

   for _, v := range s {
      v.a = 1
   }

   // assert failed
   // Expected :int64(1)
  // Actual   :int64(-9223372036854775808)
   assert.Equal(t, int64(1), s[0].a)
}

// good case
func TestPointArrayChange(t *testing.T) {
   var s []*S
   for i := 0; i < 10; i++ {
      s = append(s, byPoint())
   }

   for _, v := range s {
      v.a = 1
   }

   // assert success
   assert.Equal(t, int64(1), s[0].a)
}

总结

如同一开始所说的,值对象是跟随func存储在栈内存中的,指针对象是存储在堆内存中的。

对于值对象来说,当func结束时,栈内的值对象也会跟着从一个栈复制到另一个栈;同时存储在栈内存中意味着更少的GC和Goroutines。

对于指针对象来说,在堆内存中存储无异会增加GC和Goroutines,但是在func中传递指针对象时,仅需要传递指针即可。

综上,对于仅在方法内使用的对象,或想跨方法传递的一些小的对象,那么可以使用值对象来提升效率和减少GC;但是如果需要传递大对象,或者跨越更多方法来传递对象,那么最好还是使用指针对象来传递。

GO 调度器-协程调度器M:N scheduler

inspired from rakyll.org

Go scheduler’s job is to distribute runnable goroutines over multiple worker OS threads that runs on one or more processors. In multi-threaded computation, two paradigms have emerged in scheduling: work sharing and work stealing.

  • Work-sharing: When a processor generates new threads, it attempts to migrate some of them to the other processors with the hopes of them being utilized by the idle/underutilized processors.
  • Work-stealing: An underutilized processor actively looks for other processor’s threads and “steal” some.

The migration of threads occurs less frequently with work stealing than with work sharing. When all processors have work to run, no threads are being migrated. And as soon as there is an idle processor, migration is considered.

Go has a work-stealing scheduler since 1.1, contributed by Dmitry Vyukov. This article will go in depth explaining what work-stealing schedulers are and how Go implements one.

GOMAXPROCS

The Go scheduler uses a parameter called GOMAXPROCS to determine how many OS threads may be actively executing Go code simultaneously. Its default value is the number of CPUs on the machine, so on a machine with 8 CPUs, the scheduler will schedule Go code on up to 8 OS threads at once. (GOMAXPROCS is the n in m:n scheduling.) Goroutines that are sleeping or blocked in a communication do not need a thread at all. Goroutines that are blocked in I/O or other system calls or are calling non-Go functions, do need an OS thread, but GOMAXPROCS need not account for them.

Scheduling basics

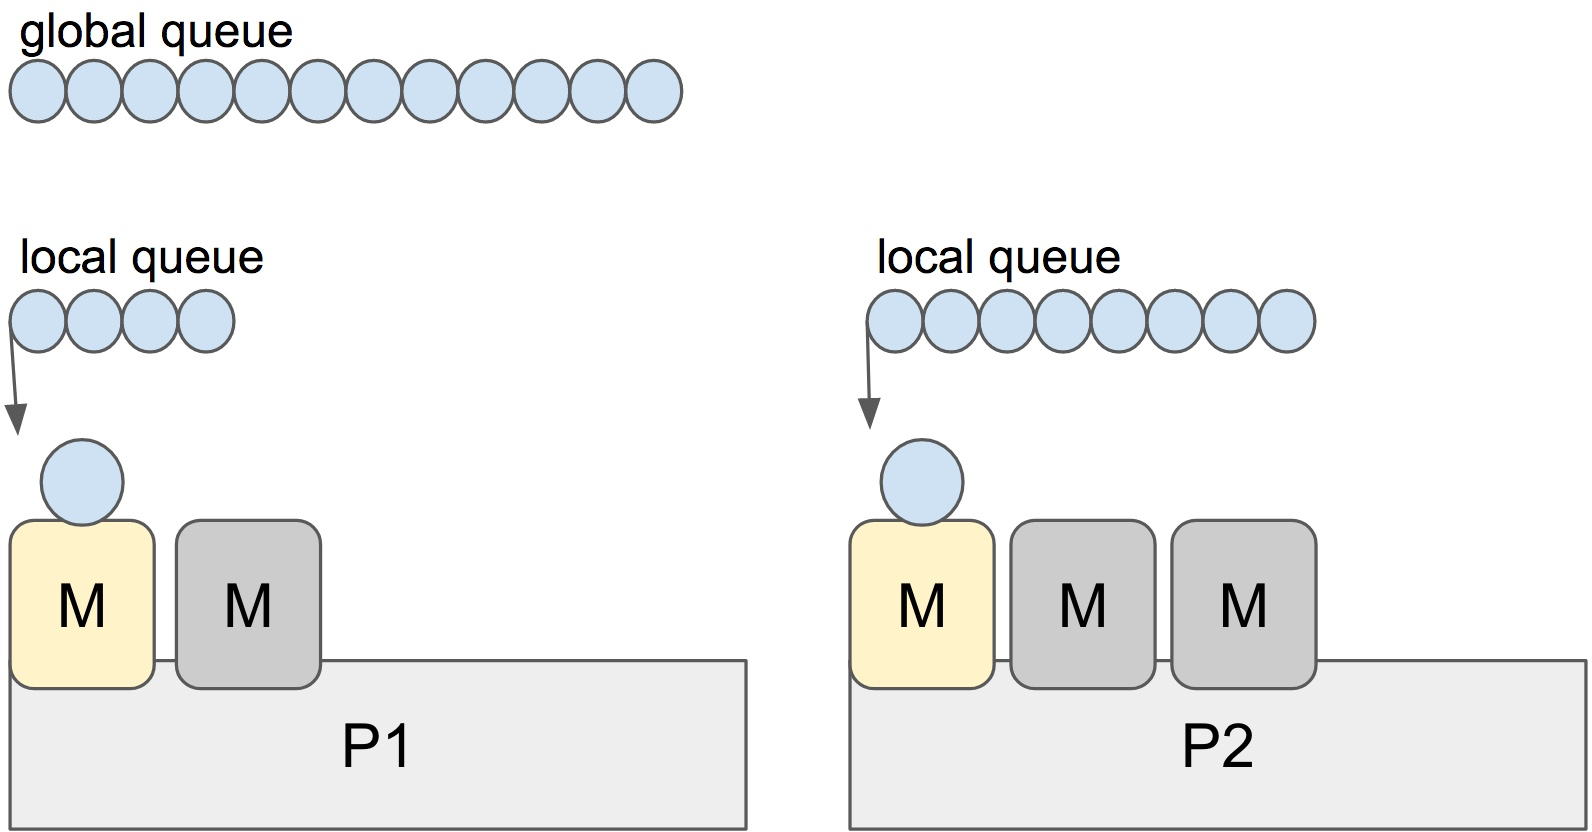
Go has an M:N scheduler that can also utilize multiple processors. At any time, M goroutines need to be scheduled on N OS threads that runs on at most GOMAXPROCS numbers of processors. Go scheduler uses the following terminology for goroutines, threads and processors:

  • G: goroutine
  • M: OS thread (machine)
  • P: processor

There is a P-specific local and a global goroutine queue. Each M should be assigned to a P. But Ps may have no Ms if they are blocked or in a system call. At any time, there are at most GOMAXPROCS number of P. At any time, only one M can run per P. More Ms can be created by the scheduler if required.

Scheduler basics

Each round of scheduling is simply finding a runnable goroutine and executing it. At each round of scheduling, the search happens in the following order:

runtime.schedule() {
    // only 1/61 of the time, check the global runnable queue for a G.
    // if not found, check the local queue.
    // if not found,
    //     try to steal from other Ps.
    //     if not, check the global runnable queue.
    //     if not found, poll network.
}

Once a runnable G is found, it is executed until it is blocked.

Note: It looks like the global queue has an advantage over the local queue but checking global queue once a while is crucial to avoid M is only scheduling from the local queue until there are no locally queued goroutines left.
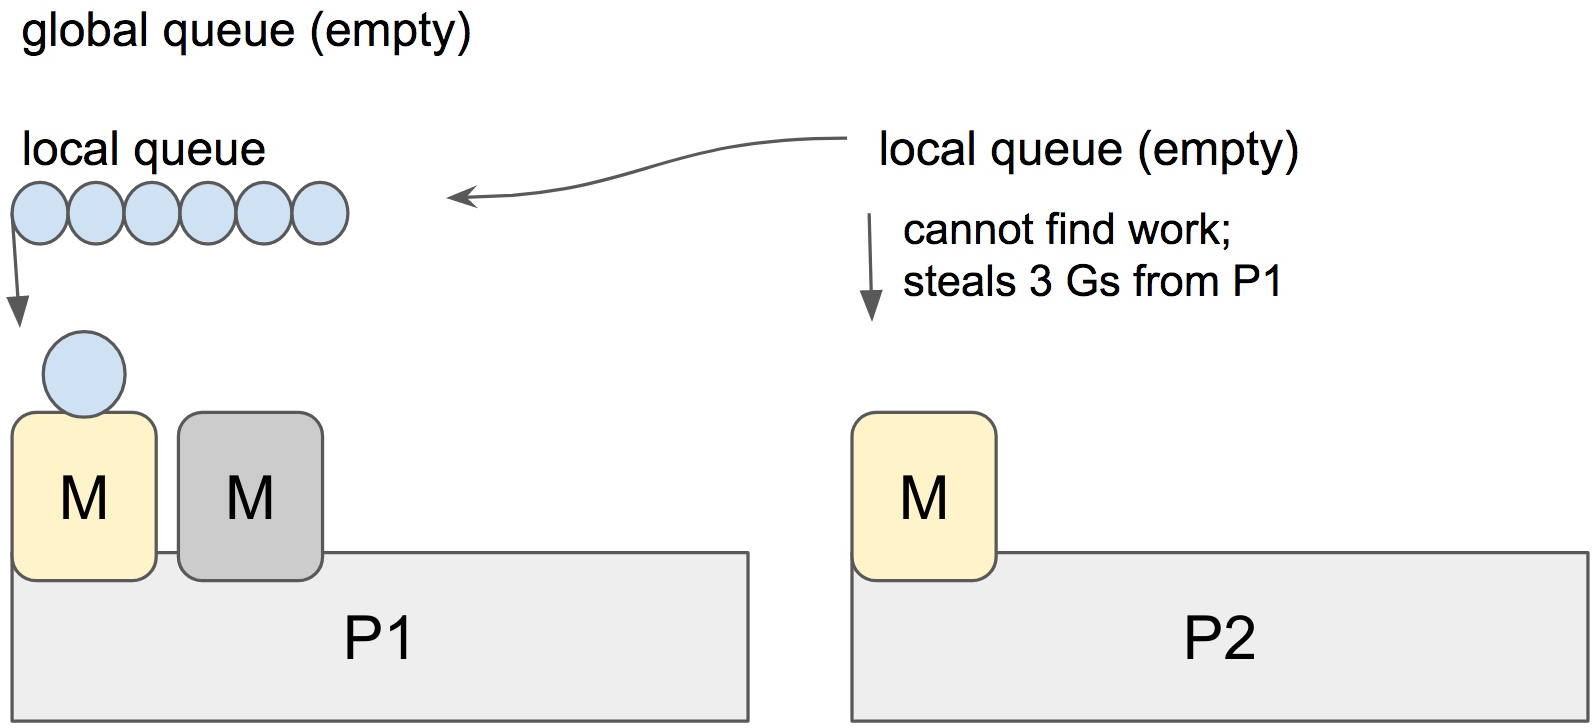
Stealing

When a new G is created or an existing G becomes runnable, it is pushed onto a list of runnable goroutines of current P. When P finishes executing G, it tries to pop a G from own list of runnable goroutines. If it’s own list is now empty, P chooses a random other processor (P) and tries to steal a half of runnable goroutines from its queue.

P2 steals from P1

In the case above, P2 cannot find any runnable goroutines. Therefore, it randomly picks another processor (P1) and steal three goroutines to its own local queue. P2 will be able to run these goroutines and scheduler work will be more fairly distributed between multiple processors.

Spinning threads

The scheduler always wants to distribute as much as runnable goroutines to Ms to utilize the processors but at the same time we need to park excessive work to conserve CPU and power. Contradictory to this, scheduler should also need to be able to scale to high-throughput and CPU intense programs.

Constant preemption is both expensive and is a problem for high-throughput programs if the performance is critical. OS threads shouldn’t frequently hand-off runnable goroutines between each other, because it leads to increased latency. Additional to that in the presence of syscalls, OS threads need to be constantly blocked and unblocked. This is costly and adds a lot of overhead.

持续的抢占代价高昂且对于性能要求高的高IO程序来说是个问题,OS线程不能够频繁地彼此传递可执行的goroutines,因为这会增加延迟。此外由于系统调用的存在,OS线程需要经常地阻塞和恢复,这很昂贵且增加的很多开销。

In order to minimize the hand-off, Go scheduler implements “spinning threads”. Spinning threads consume a little extra CPU power but they minimize the preemption of the OS threads.

为了减少彼此之间传递goroutines的次数,GO调度器实现了“自旋线程“。自旋的线程消耗一点额外的CPU但可以减少OS线程之间抢占的发生。

A thread is spinning if 线程自旋发生的场景:

  • An M with a P assignment is looking for a runnable goroutine.一个绑定了P的M在查找可执行的goroutine。
  • An M without a P assignment is looking for available Ps.一个没有绑定P的M在查找可用的P。
  • Scheduler also unparks an additional thread and spins it when it is readying a goroutine if there is an idle P and there are no other spinning threads.如果有一个空闲的P并且没有其他正在自旋的线程,调度器在准备goroutine时也会唤醒一个额外的线程并进行自旋。

There are at most GOMAXPROCS spinning Ms at any time.

When a spinning thread finds work, it takes itself out of spinning state.

Idle threads with a P assignment don’t block if there are idle Ms without a P assignment. When new goroutines are created or an M is being blocked, scheduler ensures that there is at least one spinning M. This ensures that there are no runnable goroutines that can be otherwise running; and avoids excessive M blocking/unblocking.

如果存在没有P分配的空闲Ms,则具有P分配的闲置线程不会阻塞。当新的goroutines被创建或一个M被阻塞时,scheduler确保至少有一个正在自旋M。这确保了没有可运行的goroutine被遗漏;并且避免了过度的M阻塞/解锁。

Conclusion

Go scheduler does a lot to avoid excessive preemption of OS threads by scheduling them to the right(work-sharing) and underutilized processors by work-stealing, as well as implementing “spinning” threads to avoid high occurrence of blocked/unblocked transitions.

GO调度器在避免OS线程过度抢占方面做了许多努力,包括将新创建的goroutines调度到正确的处理器上、允许未充分利用的处理器“窃取”、实现了线程的“自旋”以避免线程频繁出现阻塞/恢复状态的切换。

Scheduling events can be traced by the execution tracer. You can investigate what’s going on if you happen to believe you have poor processor utilization.

References

GO编程模式:MAP-REDUCE

在本篇文章中,我们学习一下函数式编程的中非常重要的Map、Reduce、Filter的三种操作,这三种操作可以让我们非常方便灵活地进行一些数据处理——我们的程序中大多数情况下都是在到倒腾数据,尤其对于一些需要统计的业务场景,Map/Reduce/Filter是非常通用的玩法。下面先来看几个例子:

基本示例

Map示例

下面的程序代码中,我们写了两个Map函数,这两个函数需要两个参数,

  • 一个是字符串数组 []string,说明需要处理的数据一个字符串
  • 另一个是一个函数func(s string) string 或 func(s string) int
func MapStrToStr(arr []string, fn func(s string) string) []string {
    var newArray = []string{}
    for _, it := range arr {
        newArray = append(newArray, fn(it))
    }
    return newArray
}

func MapStrToInt(arr []string, fn func(s string) int) []int {
    var newArray = []int{}
    for _, it := range arr {
        newArray = append(newArray, fn(it))
    }
    return newArray
}

整个Map函数运行逻辑都很相似,函数体都是在遍历第一个参数的数组,然后,调用第二个参数的函数,然后把其值组合成另一个数组返回。

于是我们就可以这样使用这两个函数:

var list = []string{"Hao", "Chen", "MegaEase"}

x := MapStrToStr(list, func(s string) string {
    return strings.ToUpper(s)
})
fmt.Printf("%v\n", x)
//["HAO", "CHEN", "MEGAEASE"]

y := MapStrToInt(list, func(s string) int {
    return len(s)
})
fmt.Printf("%v\n", y)
//[3, 4, 8]

我们可以看到,我们给第一个 MapStrToStr() 传了函数做的是 转大写,于是出来的数组就成了全大写的,给MapStrToInt() 传的是算其长度,所以出来的数组是每个字符串的长度。

我们再来看一下Reduce和Filter的函数是什么样的。

Reduce:

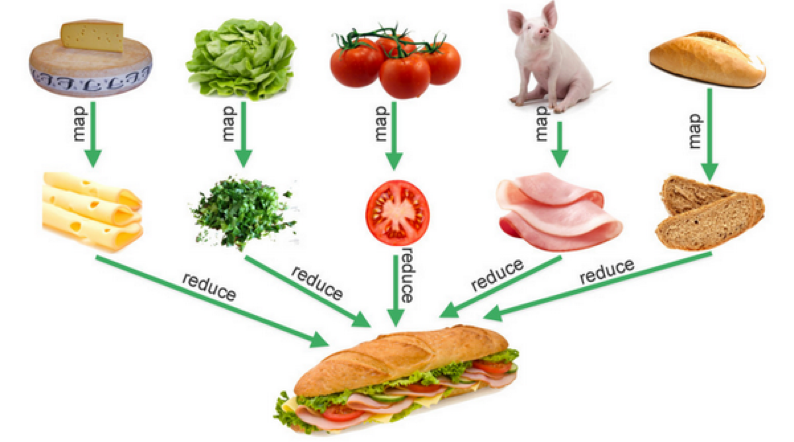
func Reduce(arr []string, fn func(s string) int) int {
    sum := 0
    for _, it := range arr {
        sum += fn(it)
    }
    return sum
}

var list = []string{"Hao", "Chen", "MegaEase"}

x := Reduce(list, func(s string) int {
    return len(s)
})
fmt.Printf("%v\n", x)
// 15

Filter:

func Filter(arr []int, fn func(n int) bool) []int {
    var newArray = []int{}
    for _, it := range arr {
        if fn(it) {
            newArray = append(newArray, it)
        }
    }
    return newArray
}

var intset = []int{1, 2, 3, 4, 5, 6, 7, 8, 9, 10}
out := Filter(intset, func(n int) bool {
   return n%2 == 1
})
fmt.Printf("%v\n", out)

out = Filter(intset, func(n int) bool {
    return n > 5
})
fmt.Printf("%v\n", out)

下图是一个比喻,其非常形象地说明了Map-Reduce是的业务语义,其在数据处理中非常有用。

业务示例

通过上面的一些示例,你可能有一些明白,Map/Reduce/Filter只是一种控制逻辑,真正的业务逻辑是在传给他们的数据和那个函数来定义的。是的,这是一个很经典的“业务逻辑”和“控制逻辑”分离解耦的编程模式,Golang中常用的sort包中也采用了这种设计模式实现了sort.Slice()方法。下面我们来看一个有业务意义的代码,来让大家强化理解一下什么叫“控制逻辑”与业务逻辑分离。

首先,我们定义一个员工对象,以及一些数据:

type Employee struct {
    Name     string
    Age      int
    Vacation int
    Salary   int
}

var list = []Employee{
    {"Hao", 44, 0, 8000},
    {"Bob", 34, 10, 5000},
    {"Alice", 23, 5, 9000},
    {"Jack", 26, 0, 4000},
    {"Tom", 48, 9, 7500},
    {"Marry", 29, 0, 6000},
    {"Mike", 32, 8, 4000},
}

然后,我们有如下的几个函数:

func EmployeeCountIf(list []Employee, fn func(e *Employee) bool) int {
    count := 0
    for i, _ := range list {
        if fn(&list[i]) {
            count += 1
        }
    }
    return count
}

func EmployeeFilterIn(list []Employee, fn func(e *Employee) bool) []Employee {
    var newList []Employee
    for i, _ := range list {
        if fn(&list[i]) {
            newList = append(newList, list[i])
        }
    }
    return newList
}

func EmployeeSumIf(list []Employee, fn func(e *Employee) int) int {
    var sum = 0
    for i, _ := range list {
        sum += fn(&list[i])
    }
    return sum
}

简单说明一下:

  • EmployeeConutIf 和 EmployeeSumIf 分别用于统满足某个条件的个数或总数。它们都是Filter + Reduce的语义。
  • EmployeeFilterIn 就是按某种条件过虑。就是Fitler的语义。

于是我们就可以有如下的代码:

1)统计有多少员工大于40岁

old := EmployeeCountIf(list, func(e *Employee) bool {
    return e.Age > 40
})
fmt.Printf("old people: %d\n", old)
//old people: 2

2)统计有多少员工薪水大于6000

high_pay := EmployeeCountIf(list, func(e *Employee) bool {
    return e.Salary >= 6000
})
fmt.Printf("High Salary people: %d\n", high_pay)
//High Salary people: 4

3)列出有没有休假的员工

no_vacation := EmployeeFilterIn(list, func(e *Employee) bool {
    return e.Vacation == 0
})
fmt.Printf("People no vacation: %v\n", no_vacation)
//People no vacation: [{Hao 44 0 8000} {Jack 26 0 4000} {Marry 29 0 6000}]

4)统计所有员工的薪资总和

total_pay := EmployeeSumIf(list, func(e *Employee) int {
    return e.Salary
})

fmt.Printf("Total Salary: %d\n", total_pay)
//Total Salary: 43500

5)统计30岁以下员工的薪资总和

younger_pay := EmployeeSumIf(list, func(e *Employee) int {
    if e.Age < 30 {
        return e.Salary
    } 
    return 0
})

泛型Map-Reduce

我们可以看到,上面的Map-Reduce都因为要处理数据的类型不同而需要写出不同版本的Map-Reduce,虽然他们的代码看上去是很类似的。所以,这里就要带出来泛型编程了,目前的Go语言的泛型只能用 interface{} + reflect来完成。

下面我们来看一下一个非常简单不作任何类型检查的泛型的Map函数怎么写:

func Map(data interface{}, fn interface{}) []interface{} {
    vfn := reflect.ValueOf(fn)
    vdata := reflect.ValueOf(data)
    result := make([]interface{}, vdata.Len())

    for i := 0; i < vdata.Len(); i++ {
        result[i] = vfn.Call([]reflect.Value{vdata.Index(i)})[0].Interface()
    }
    return result
}

上面的代码中,

  • 通过 reflect.ValueOf() 来获得 interface{} 的值,其中一个是数据 vdata,另一个是函数 vfn
  • 然后通过 vfn.Call() 方法来调用函数,通过 []refelct.Value{vdata.Index(i)}来获得数据。

于是,我们就可以有下面的代码——不同类型的数据可以使用相同逻辑的Map()代码:

square := func(x int) int {
  return x * x
}
nums := []int{1, 2, 3, 4}

squared_arr := Map(nums,square)
fmt.Println(squared_arr)
//[1 4 9 16]


upcase := func(s string) string {
  return strings.ToUpper(s)
}
strs := []string{"Hao", "Chen", "MegaEase"}
upstrs := Map(strs, upcase);
fmt.Println(upstrs)
//[HAO CHEN MEGAEASE]

但是因为反射是运行时的事,所以,如果类型什么出问题的话,就会有运行时的错误。

健壮版的Generic Map

所以,如果要写一个健壮的程序,对于这种用interface{} 的“过度泛型”,就需要我们自己来做类型检查。下面是一个有类型检查的Map代码(分为是否就地计算两个版本):

func Transform(slice, function interface{}) interface{} {
  return transform(slice, function, false)
}

func TransformInPlace(slice, function interface{}) interface{} {
  return transform(slice, function, true)
}

func transform(slice, function interface{}, inPlace bool) interface{} {
 
  //check the <code data-enlighter-language="raw" class="EnlighterJSRAW">slice</code> type is Slice
  sliceInType := reflect.ValueOf(slice)
  if sliceInType.Kind() != reflect.Slice {
    panic("transform: not slice")
  }

  //check the function signature
  fn := reflect.ValueOf(function)
  elemType := sliceInType.Type().Elem()
  if !verifyFuncSignature(fn, elemType, nil) {
    panic("trasform: function must be of type func(" + sliceInType.Type().Elem().String() + ") outputElemType")
  }

  sliceOutType := sliceInType
  if !inPlace {
    sliceOutType = reflect.MakeSlice(reflect.SliceOf(fn.Type().Out(0)), sliceInType.Len(), sliceInType.Len())
  }
  for i := 0; i < sliceInType.Len(); i++ {
    sliceOutType.Index(i).Set(fn.Call([]reflect.Value{sliceInType.Index(i)})[0])
  }
  return sliceOutType.Interface()

}

func verifyFuncSignature(fn reflect.Value, types ...reflect.Type) bool {

  //Check it is a funciton
  if fn.Kind() != reflect.Func {
    return false
  }
  // NumIn() - returns a function type's input parameter count.
  // NumOut() - returns a function type's output parameter count.
  if (fn.Type().NumIn() != len(types)-1) || (fn.Type().NumOut() != 1) {
    return false
  }
  // In() - returns the type of a function type's i'th input parameter.
  for i := 0; i < len(types)-1; i++ {
    if fn.Type().In(i) != types[i] {
      return false
    }
  }
  // Out() - returns the type of a function type's i'th output parameter.
  outType := types[len(types)-1]
  if outType != nil && fn.Type().Out(0) != outType {
    return false
  }
  return true
}

上面的代码一下子就复杂起来了,可见,复杂的代码都是在处理异常的地方。我不打算Walk through 所有的代码,别看代码多,但是还是可以读懂的,下面列几个代码中的要点:

  • 代码中没有使用Map函数,因为和数据结构和关键有含义冲突的问题,所以使用Transform,这个来源于 C++ STL库中的命名。
  • 有两个版本的函数,一个是返回一个全新的数组 – Transform(),一个是“就地完成” – TransformInPlace()
  • 在主函数中,用 Kind() 方法检查了数据类型是不是 Slice,函数类型是不是Func
  • 检查函数的参数和返回类型是通过 verifyFuncSignature() 来完成的,其中:
    • NumIn() – 用来检查函数的“入参”
    •  NumOut() 用来检查函数的“返回值”
  • 如果需要新生成一个Slice,会使用 reflect.MakeSlice() 来完成。

好了,有了上面的这段代码,我们的代码就很可以很开心的使用了:

可以用于字符串数组:

list := []string{"1", "2", "3", "4", "5", "6"}
result := Transform(list, func(a string) string{
    return a +a +a
})
//{"111","222","333","444","555","666"}

可以用于整形数组:

list := []int{1, 2, 3, 4, 5, 6, 7, 8, 9}
TransformInPlace(list, func (a int) int {
  return a*3
})
//{3, 6, 9, 12, 15, 18, 21, 24, 27}

可以用于结构体:

var list = []Employee{
    {"Hao", 44, 0, 8000},
    {"Bob", 34, 10, 5000},
    {"Alice", 23, 5, 9000},
    {"Jack", 26, 0, 4000},
    {"Tom", 48, 9, 7500},
}

result := TransformInPlace(list, func(e Employee) Employee {
    e.Salary += 1000
    e.Age += 1
    return e
})

同样,泛型版的 Reduce 代码如下:

func Reduce(slice, pairFunc, zero interface{}) interface{} {
  sliceInType := reflect.ValueOf(slice)
  if sliceInType.Kind() != reflect.Slice {
    panic("reduce: wrong type, not slice")
  }

  len := sliceInType.Len()
  if len == 0 {
    return zero
  } else if len == 1 {
    return sliceInType.Index(0)
  }

  elemType := sliceInType.Type().Elem()
  fn := reflect.ValueOf(pairFunc)
  if !verifyFuncSignature(fn, elemType, elemType, elemType) {
    t := elemType.String()
    panic("reduce: function must be of type func(" + t + ", " + t + ") " + t)
  }

  var ins [2]reflect.Value
  ins[0] = sliceInType.Index(0)
  ins[1] = sliceInType.Index(1)
  out := fn.Call(ins[:])[0]

  for i := 2; i < len; i++ {
    ins[0] = out
    ins[1] = sliceInType.Index(i)
    out = fn.Call(ins[:])[0]
  }
  return out.Interface()
}

泛型版的 Filter 代码如下:

func Filter(slice, function interface{}) interface{} {
  result, _ := filter(slice, function, false)
  return result
}

func FilterInPlace(slicePtr, function interface{}) {
  in := reflect.ValueOf(slicePtr)
  if in.Kind() != reflect.Ptr {
    panic("FilterInPlace: wrong type, " +
      "not a pointer to slice")
  }
  _, n := filter(in.Elem().Interface(), function, true)
  in.Elem().SetLen(n)
}

var boolType = reflect.ValueOf(true).Type()

func filter(slice, function interface{}, inPlace bool) (interface{}, int) {

  sliceInType := reflect.ValueOf(slice)
  if sliceInType.Kind() != reflect.Slice {
    panic("filter: wrong type, not a slice")
  }

  fn := reflect.ValueOf(function)
  elemType := sliceInType.Type().Elem()
  if !verifyFuncSignature(fn, elemType, boolType) {
    panic("filter: function must be of type func(" + elemType.String() + ") bool")
  }

  var which []int
  for i := 0; i < sliceInType.Len(); i++ {
    if fn.Call([]reflect.Value{sliceInType.Index(i)})[0].Bool() {
      which = append(which, i)
    }
  }

  out := sliceInType

  if !inPlace {
    out = reflect.MakeSlice(sliceInType.Type(), len(which), len(which))
  }
  for i := range which {
    out.Index(i).Set(sliceInType.Index(which[i]))
  }

  return out.Interface(), len(which)
}

使用反射来做这些东西,会有一个问题,那就是代码的性能会很差。所以,上面的代码不能用于你需要高性能的地方

GO编程模式:Vistor模式

Visitor 是面向对象设计模式中一个很重要的设计模式(参看Wikipedia Visitor Pattern词条),这个模式是一种将算法与操作对象的结构分离的一种方法。这种分离的实际结果是能够在不修改结构的情况下向现有对象结构添加新操作,是遵循开放/封闭原则的一种方法。

先来看一个简单设计模式的Visitor的示例。

  • 我们的代码中有一个Visitor的函数定义,还有一个Shape接口,其需要使用 Visitor函数做为参数。
  • 我们的实例的对象 Circle和 Rectangle实现了 Shape 的接口的 accept() 方法,这个方法就是等外面给我传递一个Visitor。
package main

import (
    "encoding/json"
    "encoding/xml"
    "fmt"
)

type Visitor func(shape Shape)

type Shape interface {
    accept(Visitor)
}

type Circle struct {
    Radius int
}

func (c Circle) accept(v Visitor) {
    v(c)
}

type Rectangle struct {
    Width, Heigh int
}

func (r Rectangle) accept(v Visitor) {
    v(r)
}

然后,我们实现两个Visitor,一个是用来做JSON序列化的,另一个是用来做XML序列化的

func JsonVisitor(shape Shape) {
    bytes, err := json.Marshal(shape)
    if err != nil {
        panic(err)
    }
    fmt.Println(string(bytes))
}

func XmlVisitor(shape Shape) {
    bytes, err := xml.Marshal(shape)
    if err != nil {
        panic(err)
    }
    fmt.Println(string(bytes))
}

下面是我们的使用Visitor这个模式的代码

func main() {
  c := Circle{10}
  r :=  Rectangle{100, 200}
  shapes := []Shape{c, r}

  for _, s := range shapes {
    s.accept(JsonVisitor)
    s.accept(XmlVisitor)
  }

}

这段代码的目的就是想解耦 数据结构和 算法,使用 Strategy 模式也是可以完成的,而且会比较干净。但是在有些情况下,多个Visitor是来访问一个数据结构的不同部分,这种情况下,数据结构有点像一个数据库,而各个Visitor会成为一个个小应用。 kubectl就是这种情况。

Vistor在k8s中的应用

Kubernetes 的 kubectl 命令中主要使用到了两个设计模式,一个是Builder,另一个是Visitor。

kubectl 的代码比较复杂,不过,其本原理简单来说,它从命令行和yaml文件中获取信息,通过Builder模式并把其转成一系列的资源,最后用 Visitor 模式模式来迭代处理这些Reources

首先,kubectl 主要是用来处理 Info结构体,下面是相关的定义:

type VisitorFunc func(*Info, error) error

type Visitor interface {
    Visit(VisitorFunc) error
}

type Info struct {
    Namespace   string
    Name        string
    OtherThings string
}
func (info *Info) Visit(fn VisitorFunc) error {
  return fn(info, nil)
}

我们可以看到,

  • 有一个 VisitorFunc 的函数类型的定义
  • 一个 Visitor 的接口,其中需要 Visit(VisitorFunc) error  的方法(这就像是我们上面那个例子的 Shape )
  • 最后,为Info 实现 Visitor 接口中的 Visit() 方法,实现就是直接调用传进来的方法(与前面的例子相仿)

我们再来定义几种不同类型的 Visitor。

Log Visitor
type LogVisitor struct {
  visitor Visitor
}

func (v LogVisitor) Visit(fn VisitorFunc) error {
  return v.visitor.Visit(func(info *Info, err error) error {
    fmt.Println("LogVisitor() before call function")
    err = fn(info, err)
    fmt.Println("LogVisitor() after call function")
    return err
  })
}
Name Visitor

这个Visitor 主要是用来访问 Info 结构中的 Name 和 NameSpace 成员

type NameVisitor struct {
  visitor Visitor
}

func (v NameVisitor) Visit(fn VisitorFunc) error {
  return v.visitor.Visit(func(info *Info, err error) error {
    fmt.Println("NameVisitor() before call function")
    err = fn(info, err)
    if err == nil {
      fmt.Printf("==> Name=%s, NameSpace=%s\n", info.Name, info.Namespace)
    }
    fmt.Println("NameVisitor() after call function")
    return err
  })
}

使用:

func main() {
  info := Info{}
  var v Visitor = &info
  v = LogVisitor{v}
  v = NameVisitor{v}
  v = OtherThingsVisitor{v}

  loadFile := func(info *Info, err error) error {
    info.Name = "Hao Chen"
    info.Namespace = "MegaEase"
    info.OtherThings = "We are running as remote team."
    return nil
  }
  v.Visit(loadFile)
}

上面的代码,我们可以看到

  • Visitor们一层套一层
  • 我用 loadFile 假装从文件中读如数据
  • 最后一条 v.Visit(loadfile) 我们上面的代码就全部开始激活工作了。

上面的代码输出如下的信息,你可以看到代码的执行顺序是怎么执行起来了

LogVisitor() before call function
NameVisitor() before call function
OtherThingsVisitor() before call function
==> OtherThings=We are running as remote team.
OtherThingsVisitor() after call function
==> Name=Hao Chen, NameSpace=MegaEase
NameVisitor() after call function
LogVisitor() after call function

上面的代码有以下几种功效:

  • 解耦了数据和程序。
  • 使用了修饰器模式
  • 还做出来pipeline的模式

用修饰器模式重构以上代码

type VisitorFunc func(*Info, error) error

type Visitor interface {
	Visit(VisitorFunc) error
}

type Info struct {
	Namespace   string
	Name        string
	OtherThings string
}

func (info *Info) Visit(fn VisitorFunc) error {
	fmt.Println("Info Visit()")
	return fn(info, nil)
}

func NameVisitor(info *Info, err error) error {
	fmt.Println("NameVisitor() before call function")
	fmt.Printf("==> Name=%s, NameSpace=%s\n", info.Name, info.Namespace)
	return err
}

func LogVisitor(info *Info, err error) error {
	fmt.Println("LogVisitor() before call function")
	return err
}

func OtherVisitor(info *Info, err error) error {
	fmt.Println("OtherThingsVisitor() before call function")
	return err
}

type DecoratedVisitor struct {
	visitor    Visitor
	decorators []VisitorFunc
}

func NewDecoratedVisitor(v Visitor, fn ...VisitorFunc) Visitor {
	if len(fn) == 0 {
		return v
	}
	return DecoratedVisitor{v, fn}
}

func (v DecoratedVisitor) Visit(fn VisitorFunc) error {
	fmt.Println("DecoratedVisitor Visit()")
	return v.visitor.Visit(func(info *Info, err error) error {
		fmt.Println("DecoratedVisitor v.visitor.Visit()")
		if err != nil {
			return err
		}
		if err := fn(info, nil); err != nil {
			return err
		}
		for i := range v.decorators {
			if err := v.decorators[i](info, nil); err != nil {
				return err
			}
		}
		return nil
	})
}

运行:

func main() {
	info := Info{}
	var v Visitor = &info
	v = NewDecoratedVisitor(v, LogVisitor, NameVisitor, OtherVisitor)//函数式编程

	loadFile := func(info *Info, err error) error {
		fmt.Println("loadFile()")
		info.Name = "Hao Chen"
		info.Namespace = "MegaEase"
		info.OtherThings = "We are running as remote team."
		return nil
	}

	v.Visit(loadFile)
}

注意:DecoratedVisitor本身也是一个Vistor

上面的这些代码全部存在于 kubectl 的代码中,你看懂了这里面的代码逻辑,能够更容易看懂 kubectl 的代码了。

GO编程模式:嵌入和委托

嵌入

在Go语言中,我们可以很方便的把一个结构体给嵌到另一个结构体中。如下所示:

type Widget struct {
    X, Y int
}
type Label struct {
    Widget        // Embedding (delegation)
    Text   string // Aggregation
    X int //duplicate param name
}

在 Label 结构体里出现了重名,就需要解决重名,例如,如果 成员 X 重名,用 label.X表明 是自己的X ,用  label.Wedget.X 表示嵌入过来的。

label := Label{Widget{10, 10}, "State:",20}

label.X = 20
label.Widget.X = 10

有了这样的嵌入,就可以像UI组件一样的在结构构的设计上进行层层分解。比如,我可以新出来两个结构体 Button 和 ListBox

type Button struct {
    Label // Embedding (delegation)
}

type ListBox struct {
    Widget          // Embedding (delegation)
    Texts  []string // Aggregation
    Index  int      // Aggregation
}

方法重写

定义两个接口 Painter 用于把组件画出来,Clicker 用于表明点击事件:

type Painter interface {
    Paint()
}
 
type Clicker interface {
    Click()
}

当然,

  • 对于 Lable 来说,只有 Painter ,没有Clicker
  • 对于 Button 和 ListBox来说,Painter 和Clicker都有。

下面是一些实现:

func (label Label) Paint() {
  fmt.Printf("Label.Paint(%q)\n", label.Text)
}

//因为这个接口可以通过 Label 的嵌入带到新的结构体,
//所以,可以在 Button 中可以重载这个接口方法
func (button Button) Paint() { // Override
    fmt.Printf("Button.Paint(%s)\n", button.Text)
}
func (button Button) Click() {
    fmt.Printf("Button.Click(%s)\n", button.Text)
}


func (listBox ListBox) Paint() {
    fmt.Printf("ListBox.Paint(%q)\n", listBox.Texts)
}
func (listBox ListBox) Click() {
    fmt.Printf("ListBox.Click(%q)\n", listBox.Texts)
}

这里,需要重点说明一下,Button.Paint() 接口可以通过 Label 的嵌入带到新的结构体,如果 Button.Paint() 不实现的话,会调用 Label.Paint() ,所以,在 Button 中声明 Paint() 方法,相当于Override

通过下面的程序可以看到,整个多态是怎么执行的:

label := Label{Widget{10, 10}, "State:",20}
button1 := Button{Label{Widget{10, 70}, "OK"}}
button2 := NewButton(50, 70, "Cancel")
listBox := ListBox{Widget{10, 40}, 
    []string{"AL", "AK", "AZ", "AR"}, 0}

for _, painter := range []Painter{label, listBox, button1, button2} {
    painter.Paint()
    fmt.Println() // print a empty line 
}

/*output:
Label.Paint("State:")

ListBox.Paint(["AL" "AK" "AZ" "AR"]) *override label's Paint*

Button.Paint(OK) *override label's Paint*

Button.Paint(Cancel) *override label's Paint*
*/
 
for _, widget := range []interface{}{label, listBox, button1, button2} {
  widget.(Painter).Paint()
  if clicker, ok := widget.(Clicker); ok {
    clicker.Click()
  }
  //call embed's method
  if embedLabel, ok := widget.(Button); ok {
    embedLabel.Label.Paint()
  }
  fmt.Println() // print a empty line 
}

/*output:
Label.Paint("State:")

ListBox.Paint(["AL" "AK" "AZ" "AR"]) *override label's Paint*
ListBox.Click(["AL" "AK" "AZ" "AR"]) *implement Click*

Button.Paint(OK) *override label's Paint*
Button.Click(OK) *implement Click*
Label.Paint("OK") *call embed's method*

Button.Paint(Cancel) *override label's Paint*
Button.Click(Cancel) *implement Click*
Label.Paint("Cancel") *call embed's method*
*/

GO编程模式:反转控制

有一个开关要控制一个灯的开和关这两个动作,最常见也是最没有技术含量的实现会是这个样子:

然后,有一天,我们发现需要对灯泡扩展一下,于是我们做了个抽象类:

但是,如果有一天,我们发现这个开关可能还要控制别的不单单是灯泡的东西,我们就发现这个开关耦合了灯泡这种类别,非常不利于我们的扩展,于是反转控制出现了。

就像现实世界一样,造开关的工厂根本不关心要控制的东西是什么,它只做一个开关应该做好的事,就是把电接通,把电断开(不管是手动的,还是声控的,还是光控,还是遥控的),而我们的造各种各样的灯泡(不管是日光灯,白炽灯)的工厂也不关心你用什么样的开关,反正我只管把灯的电源接口给做出来,然后,开关厂和电灯厂依赖于一个标准的通电和断电的接口。于是产生了IoC控制反转,如下图:

所谓控制反转的意思是,开关从以前的设备的专用开关,转变到了控制电源的开关,而以前的设备要反过来依赖于开关厂声明的电源连接接口。只要符合开关厂定义的电源连接的接口,这个开关可以控制所有符合这个电源连接接口的设备也就是说,开关从依赖设备这种情况,变成了,设备反过来依赖于开关所定义的接口

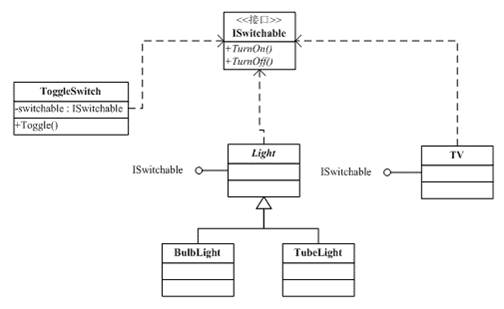
反转控制IoC – Inversion of Control 是一种软件设计的方法,其主要的思想是把控制逻辑与业务逻辑分享,不要在业务逻辑里写控制逻辑,这样会让控制逻辑依赖于业务逻辑,而是反过来,让业务逻辑依赖控制逻辑。与这个开关和电灯的示例一样,开关是控制逻辑,电器是业务逻辑,不要在电器中实现开关,而是把开关抽象成一种协议,让电器都依赖之。这样的编程方式可以有效的降低程序复杂度,并提升代码重用

比如有一个存放整数的数据结构,如下所示:

type IntSet struct {
    data map[int]bool
}
func NewIntSet() IntSet {
    return IntSet{make(map[int]bool)}
}
func (set *IntSet) Add(x int) {
    set.data[x] = true
}
func (set *IntSet) Delete(x int) {
    delete(set.data, x)
}
func (set *IntSet) Contains(x int) bool {
    return set.data[x]
}

其中实现了 Add() 、Delete() 和 Contains() 三个操作,前两个是写操作,后一个是读操作。

现在我们想实现一个 Undo 的功能。我们可以把把 IntSet 再包装一下变成 UndoableIntSet 代码如下所示:

type UndoableIntSet struct { // Poor style
    IntSet    // Embedding (delegation)
    functions []func()
}
 
func NewUndoableIntSet() UndoableIntSet {
    return UndoableIntSet{NewIntSet(), nil}
}
 

func (set *UndoableIntSet) Add(x int) { // Override
    if !set.Contains(x) {
        set.data[x] = true
        set.functions = append(set.functions, func() { set.Delete(x) })
    } else {
        set.functions = append(set.functions, nil)
    }
}


func (set *UndoableIntSet) Delete(x int) { // Override
    if set.Contains(x) {
        delete(set.data, x)
        set.functions = append(set.functions, func() { set.Add(x) })
    } else {
        set.functions = append(set.functions, nil)
    }
}

func (set *UndoableIntSet) Undo() error {
    if len(set.functions) == 0 {
        return errors.New("No functions to undo")
    }
    index := len(set.functions) - 1
    if function := set.functions[index]; function != nil {
        function()
        set.functions[index] = nil // For garbage collection
    }
    set.functions = set.functions[:index]
    return nil
}

在上面的代码中,我们可以看到

  • 我们在 UndoableIntSet 中嵌入了IntSet ,然后Override了 它的 Add()和 Delete() 方法。
  • Contains() 方法没有Override,所以,会被带到 UndoableInSet 中来了。
  • 在Override的 Add()中,记录 Delete 操作
  • 在Override的 Delete() 中,记录 Add 操作
  • 在新加入 Undo() 中进行Undo操作。

通过这样的方式来为已有的代码扩展新的功能是一个很好的选择,这样,可以在重用原有代码功能和重新新的功能中达到一个平衡。但是,这种方式最大的问题是,Undo操作其实是一种控制逻辑,并不是业务逻辑,所以,在复用 Undo这个功能上是有问题。因为其中加入了大量跟 IntSet 相关的业务逻辑

通过反转依赖实现反转控制

现在我们来看另一种方法:

我们先声明一种函数接口,表现我们的Undo控制可以接受的函数签名是什么样的:

type Undo []func()

然后,我们在我们的IntSet里嵌入 Undo,然后,再在 Add() 和 Delete() 里使用上面的方法,就可以完成功能。

type IntSet struct {
    data map[int]bool
    undo Undo
}
 
func NewIntSet() IntSet {
    return IntSet{data: make(map[int]bool)}
}

func (set *IntSet) Undo() error {
    return set.undo.Undo()
}
 
func (set *IntSet) Contains(x int) bool {
    return set.data[x]
}

func (set *IntSet) Add(x int) {
    if !set.Contains(x) {
        set.data[x] = true
        set.undo.Add(func() { set.Delete(x) })
    } else {
        set.undo.Add(nil)
    }
}
 
func (set *IntSet) Delete(x int) {
    if set.Contains(x) {
        delete(set.data, x)
        set.undo.Add(func() { set.Add(x) })
    } else {
        set.undo.Add(nil)
    }
}

可以看见在这次实现中,不再由 控制逻辑 Undo 来依赖业务逻辑 IntSet,而是由业务逻辑 IntSet 来依赖 Undo ,这个就是控制反转。

其依赖的是其实是一个协议,这个协议是一个没有参数的函数数组。我们也可以看到,我们 Undo 的代码就可以复用了

GO编程模式:装饰器模式

Go语言的修饰器编程模式,其实也是函数式编程的一种形式,这种模式很容易的可以把一些函数装配到另外一些函数上,可以让你的代码更为的简单,也可以让一些“小功能型”的代码复用性更高,让代码中的函数可以像乐高玩具那样自由地拼装。

不过,目前版本Go(最新1.20)语言的“糖”不多,而且又是强类型的静态无虚拟机的语言,所以,无法做到像 Java 和 Python 那样的优雅的修饰器的代码。

示例

package main

import "fmt"

func decorator(f func(s string)) func(s string) {

    return func(s string) {
        fmt.Println("Started")
        f(s)
        fmt.Println("Done")
    }
}

func Hello(s string) {
    fmt.Println(s)
}

func main() {
        decorator(Hello)("Hello, World!")
}

这段代码中动用了一个高阶函数 decorator(),在调用的时候,先把 Hello() 函数传进去,然后其返回一个匿名函数,这个匿名函数中除了运行了自己的代码,也调用了被传入的 Hello() 函数。

这个玩法和 Python 的异曲同工,只不过,有些遗憾的是,Go 并不支持像 Python 那样的 @decorator 语法糖。所以,在调用上有些难看。当然,如果你要想让代码容易读一些,你可以这样:

hello := decorator(Hello)
hello("Hello")

多个修饰器的 Pipeline

再来看一个处理 HTTP 请求的相关的例子:

package main

import (
    "fmt"
    "log"
    "net/http"
    "strings"
)

func WithServerHeader(h http.HandlerFunc) http.HandlerFunc {
    return func(w http.ResponseWriter, r *http.Request) {
        log.Println("--->WithServerHeader()")
        w.Header().Set("Server", "HelloServer v0.0.1")
        h(w, r)
    }
}

func hello(w http.ResponseWriter, r *http.Request) {
    log.Printf("Recieved Request %s from %s\n", r.URL.Path, r.RemoteAddr)
    fmt.Fprintf(w, "Hello, World! "+r.URL.Path)
}

func main() {
    http.HandleFunc("/v1/hello", WithServerHeader(hello))
    err := http.ListenAndServe(":8080", nil)
    if err != nil {
        log.Fatal("ListenAndServe: ", err)
    }
}

上面代码中使用到了修饰模式,WithServerHeader() 函数就是一个 Decorator,其传入一个 http.HandlerFunc,然后返回一个改写的版本。上面的例子还是比较简单,用 WithServerHeader() 就可以加入一个 Response 的 Header。

于是,这样的函数我们可以写出好些个。如下所示,有写 HTTP 响应头的,有写认证 Cookie 的,有检查认证Cookie的,有打日志的……

package main

import (
    "fmt"
    "log"
    "net/http"
    "strings"
)

func WithServerHeader(h http.HandlerFunc) http.HandlerFunc {
    return func(w http.ResponseWriter, r *http.Request) {
        log.Println("--->WithServerHeader()")
        w.Header().Set("Server", "HelloServer v0.0.1")
        h(w, r)
    }
}

func WithAuthCookie(h http.HandlerFunc) http.HandlerFunc {
    return func(w http.ResponseWriter, r *http.Request) {
        log.Println("--->WithAuthCookie()")
        cookie := &http.Cookie{Name: "Auth", Value: "Pass", Path: "/"}
        http.SetCookie(w, cookie)
        h(w, r)
    }
}

func WithBasicAuth(h http.HandlerFunc) http.HandlerFunc {
    return func(w http.ResponseWriter, r *http.Request) {
        log.Println("--->WithBasicAuth()")
        cookie, err := r.Cookie("Auth")
        if err != nil || cookie.Value != "Pass" {
            w.WriteHeader(http.StatusForbidden)
            return
        }
        h(w, r)
    }
}

func WithDebugLog(h http.HandlerFunc) http.HandlerFunc {
    return func(w http.ResponseWriter, r *http.Request) {
        log.Println("--->WithDebugLog")
        r.ParseForm()
        log.Println(r.Form)
        log.Println("path", r.URL.Path)
        log.Println("scheme", r.URL.Scheme)
        log.Println(r.Form["url_long"])
        for k, v := range r.Form {
            log.Println("key:", k)
            log.Println("val:", strings.Join(v, ""))
        }
        h(w, r)
    }
}
func hello(w http.ResponseWriter, r *http.Request) {
    log.Printf("Recieved Request %s from %s\n", r.URL.Path, r.RemoteAddr)
    fmt.Fprintf(w, "Hello, World! "+r.URL.Path)
}

func main() {
    http.HandleFunc("/v1/hello", WithServerHeader(WithAuthCookie(hello)))
    http.HandleFunc("/v2/hello", WithServerHeader(WithBasicAuth(hello)))
    http.HandleFunc("/v3/hello", WithServerHeader(WithBasicAuth(WithDebugLog(hello))))
    err := http.ListenAndServe(":8080", nil)
    if err != nil {
        log.Fatal("ListenAndServe: ", err)
    }
}

在使用上,需要对函数一层层的套起来,看上去好像不是很好看,如果需要 decorator 比较多的话,代码会比较难看了。嗯,我们可以重构一下。

是不是很眼熟?没错,可以像函数式编程那样,写一个带有可变decorator参数的工具函数——用来遍历并调用各个 decorator

type HttpHandlerDecorator func(http.HandlerFunc) http.HandlerFunc

func Handler(h http.HandlerFunc, decors ...HttpHandlerDecorator) http.HandlerFunc {
    for i := range decors {
        d := decors[len(decors)-1-i] // iterate in reverse
        h = d(h)
    }
    return h
}

然后使用就会变得优雅很多:

http.HandleFunc("/v4/hello", Handler(hello,
                WithServerHeader, WithBasicAuth, WithDebugLog,.....,...))

泛型的修饰器

不过,对于 Go 的修饰器模式,还有一个小问题 —— 好像无法做到泛型,就像上面那个计算时间的函数一样,其代码耦合了需要被修饰的函数的接口类型,无法做到非常通用,如果这个事解决不了,那么,这个修饰器模式还是有点不好用的。

因为 Go 语言不像 Python 和 Java,Python是动态语言,而 Java 有语言虚拟机,所以他们可以干好些比较变态的事,然而 Go 语言是一个静态的语言,这意味着其类型需要在编译时就要搞定,否则无法编译。不过,Go 语言支持的最大的泛型是 interface{} 还有比较简单的 reflection 机制,应该是可实现的。

func Decorator(decoPtr, fn interface{}) (err error) {
    var decoratedFunc, targetFunc reflect.Value

    decoratedFunc = reflect.ValueOf(decoPtr).Elem()
    targetFunc = reflect.ValueOf(fn)

    v := reflect.MakeFunc(targetFunc.Type(),
            func(in []reflect.Value) (out []reflect.Value) {
                fmt.Println("before")
                out = targetFunc.Call(in)
                fmt.Println("after")
                return
            })

    decoratedFunc.Set(v)
    return
}

上面的代码动用了 reflect.MakeFunc() 函数制出了一个新的函数其中的 targetFunc.Call(in) 调用了被修饰的函数。

上面这个 Decorator() 需要两个参数,

  • 第一个是出参 decoPtr ,就是完成修饰后的函数
  • 第二个是入参 fn ,就是需要修饰的函数

使用例子,首先假设我们有两个需要修饰的函数:

func foo(a, b, c int) int {
    fmt.Printf("%d, %d, %d \n", a, b, c)
    return a + b + c
}

func bar(a, b string) string {
    fmt.Printf("%s, %s \n", a, b)
    return a + b
}

使用:

type MyFoo func(int, int, int) int
var myfoo MyFoo
Decorator(&myfoo, foo)
myfoo(1, 2, 3)

使用 Decorator() 时,还需要先声明一个函数签名,感觉好傻啊。一点都不泛型,不是吗?

嗯。如果不想声明函数签名,那么你也可以这样

mybar := bar
Decorator(&mybar, bar)
mybar("hello,", "world!")

GO编程模式:函数式编程

在编程中,会经常性的需要对一个对象(或是业务实体)进行相关的配置。比如下面这个业务实体:

type Server struct {

Addr string

Port int

Protocol string

Timeout time.Duration

MaxConns int

TLS *tls.Config

}

在这个 Server 对象中,我们可以看到:

  • 要有侦听的IP地址 Addr 和端口号 Port ,这两个配置选项是必填的(当然,IP地址和端口号都可以有默认值,当这里我们用于举例认为是没有默认值,而且不能为空,需要必填的)。
  • 然后,还有协议 Protocol 、 Timeout 和MaxConns 字段,这几个字段是不能为空的,但是有默认值的,比如:协议是tcp, 超时30秒 和 最大链接数1024个。
  • 还有一个 TLS 这个是安全链接,需要配置相关的证书和私钥。这个是可以为空的。

所以,针对于上述这样的配置,我们需要有多种不同的创建不同配置 Server 的函数签名,如下所示(代码比较宽,需要左右滚动浏览):

func NewDefaultServer(addr string, port int) (*Server, error) {

return &Server{addr, port, "tcp", 30 * time.Second, 100, nil}, nil

}

func NewTLSServer(addr string, port int, tls *tls.Config) (*Server, error) {

return &Server{addr, port, "tcp", 30 * time.Second, 100, tls}, nil

}

func NewServerWithTimeout(addr string, port int, timeout time.Duration) (*Server, error) {

return &Server{addr, port, "tcp", timeout, 100, nil}, nil

}

func NewTLSServerWithMaxConnAndTimeout(addr string, port int, maxconns int, timeout time.Duration, tls *tls.Config) (*Server, error) {

return &Server{addr, port, "tcp", 30 * time.Second, maxconns, tls}, nil

}

因为Go语言不支持重载函数,所以,你得用不同的函数名来应对不同的配置选项。

配置对象方案

要解决这个问题,最常见的方式是使用一个配置对象,如下所示:

type Config struct {

Protocol string

Timeout time.Duration

Maxconns int

TLS *tls.Config

}

我们把那些非必输的选项都移到一个结构体里,于是 Server 对象变成了:

type Server struct {

Addr string

Port int

Conf *Config

}

于是,我们只需要一个 NewServer() 的函数了,在使用前需要构造 Config 对象。

func NewServer(addr string, port int, conf *Config) (*Server, error) {

if conf == nil{
//new conf etc....
}

//set value

}

//Using the default configuratrion

srv1, _ := NewServer("localhost", 9000, nil)

conf := ServerConfig{Protocol:"tcp", Timeout: 60*time.Duration}

srv2, _ := NewServer("locahost", 9000, &conf)

这段代码虽然不错,但是,能看到其中有一点不好的是,Config 并不是必需的,还需要判断是否是 nil 或是 Empty – Config{}这让代码感觉还是有点不是很干净。

Builder模式

当然,我们可以把上面代码改写成如下的代码:

//使用一个builder类来做包装
type ServerBuilder struct {
  Server
}

func (sb *ServerBuilder) Create(addr string, port int) *ServerBuilder {
  sb.Server.Addr = addr
  sb.Server.Port = port
  //其它代码设置其它成员的默认值
  return sb
}

func (sb *ServerBuilder) WithProtocol(protocol string) *ServerBuilder {
  sb.Server.Protocol = protocol 
  return sb
}

func (sb *ServerBuilder) WithMaxConn( maxconn int) *ServerBuilder {
  sb.Server.MaxConns = maxconn
  return sb
}

func (sb *ServerBuilder) WithTimeOut( timeout time.Duration) *ServerBuilder {
  sb.Server.Timeout = timeout
  return sb
}

func (sb *ServerBuilder) WithTLS( tls *tls.Config) *ServerBuilder {
  sb.Server.TLS = tls
  return sb
}

func (sb *ServerBuilder) Build() (Server) {
  return  sb.Server
}

于是就可以以如下的方式来使用了:

sb := ServerBuilder{}
server, err := sb.Create("127.0.0.1", 8080).
  WithProtocol("udp").
  WithMaxConn(1024).
  WithTimeOut(30*time.Second).
  Build()

这样的方式也很清楚,不需要额外的Config类,使用链式的函数调用的方式来构造一个对象,只需要多加一个Builder类,这个Builder类似乎有点多余,感觉也可以直接在Server 上进行这样的 Builder 构造,但是在处理错误的时候可能就有点麻烦(需要为Server结构增加一个error 成员,破坏了Server结构体的“纯洁”),不如一个包装类更好一些。

那么,如果想省掉这个包装的结构体,那么就轮到我们的Functional Options上场了,函数式编程。

Functional Options

首先,我们先定义一个函数类型:

type Option func(*Server)

然后,我们可以使用函数式的方式定义一组如下的函数:

func Protocol(p string) Option {
    return func(s *Server) {
        s.Protocol = p
    }
}
func Timeout(timeout time.Duration) Option {
    return func(s *Server) {
        s.Timeout = timeout
    }
}
func MaxConns(maxconns int) Option {
    return func(s *Server) {
        s.MaxConns = maxconns
    }
}
func TLS(tls *tls.Config) Option {
    return func(s *Server) {
        s.TLS = tls
    }
}

再定一个 NewServer()的函数,其中,有一个可变参数 options 其可以传出多个上面上的函数,然后使用一个for-loop来调用这些函数设置我们的 Server 对象。

func NewServer(addr string, port int, options ...func(*Server)) (*Server, error) {

  srv := Server{
    Addr:     addr,
    Port:     port,
    Protocol: "tcp",
    Timeout:  30 * time.Second,
    MaxConns: 1000,
    TLS:      nil,
  }
  for _, option := range options {
    option(&srv)
  }
  //...
  return &srv, nil
}

于是,创建对象的时候就可以这样使用:

s1, _ := NewServer("localhost", 1024)
s2, _ := NewServer("localhost", 2048, Protocol("udp"))
s3, _ := NewServer("0.0.0.0", 8080, Timeout(300*time.Second), MaxConns(1000))

所以,以后,大家在要玩类似的代码时,强烈推荐使用Functional Options这种方式,这种方式至少带来了如下的好处:

  • 直觉式的编程
  • 高度的可配置化
  • 很容易维护和扩展
  • 自文档
  • 容易上手
  • 没有什么容易遗漏的事(判空)

Manage Child Goroutines With context.Context

context.Context

As described in official Go documentation,context.Context carries deadlines, cancelation signals, and other scoped values across boundaries and between processes.

Basic usage

Context represents scope or the lifetime of the attached goroutines. When you see a function signature that looks like the following:

// Task is a function that can be and should be run as goroutine,
// it can be cancelled by cancelling the input context.
func Task(context.Context, ...args interface{})

It means that you can use the function as following:

func main() {
    // Create a new context being cancelled in 5 seconds.
    ctx, _ := context.WithTimeout(context.Background(), 5 * time.Second)
    // Start a new goroutine whose lifetime's attached to ctx.
    go task(ctx, args...)
}

The above code means that if the task function lasts over 5 seconds, it will be canceled, which helps avoid leaking goroutines.

You should design your own API in the manner shown above. When you have some long-running functions, consider attaching their lifetime to the context.

Create and derive context

To create a new and empty context, use:

// Create a new, empty, and unexecuted context.
context.Background()

Contexts can be derived, child contexts are complete once parent context is finished.

func main() {
    // Create a new context.
    parent, cancelParent := context.WithCancel(context.Background())
    // Derive child contexts from parent.
    childA, _ := context.WithTimeout(parent, 5 * time.Secound)
    childB, _ := context.WithDeadline(parent, time.Now().Add(1 * time.Minute)
    go func() {
        <-childA.Done()
        <-childB.Done()
        fmt.Println("All children are done")
    }()
    // Cancel parent make all children are cancelled.
    cancelParent()
}
// -> Result: All children are done
  • context.WithCancel(parentContext) creates a new context which completes when the returned cancel function is called or when the parent’s context finishes, whichever happens first.
  • context.WithTimeout(contextContext, 5 * time.Second) creates a new context which finishes when the returned cancel function is called or when it exceeds timeout or when the parent’s context finishes, whichever happens first.
  • context.WithDeadline(parentContext, time.Now().Add(1 * time.Minute) creates a new context which finishes when the returned cancel function deadline expires or when the parent’s context completes, whichever happens first.

There are some other methods to derive context. Check out here for further details.

Manage Child Goroutines

Now’s let solve a real-world common problem with context.Context.

The following is a very common use case in concurrency programming:

“You have 2 tasks A and B. Your main goroutine forks N goroutines (workers) running task A and M goroutines (workers) running task B. How do you gracefully shut down all child tasks when your main goroutine finished (e.g. user requests to close application)?”

package main

import (
	"context"
	"fmt"
	"os"
	"os/signal"
)

func taskA(ctx context.Context, index int) {
	done := false
	go func() {
		// Keep doing something.
		for i := 0; !done; i++ {
			fmt.Printf("A%d%d\n", index, i)
		}
	}()

	// Wait util context is cancelled.
	<-ctx.Done()
	// Turn on closing flag.
	done = true
}

func taskB(ctx context.Context, index int) {
loop:
	for i := 0; ; i++ {
		select {
		// Try pushing some message to some channel.
		case someChannel <- fmt.Sprintf("B%d%d\n", index, i):
			continue loop
			// Or when context is cancelled, finish the task.
		case <-ctx.Done():
			break loop
		}
	}
}

func main() {
	// Create application context.
	ctx, cancel := context.WithCancel(context.Background())

	// Fork n of task A with application context.
	for i := 0; i < N; i++ {
		go taskA(ctx, i)
	}

	// Fork m of task B with application context.
	for i := 0; i < M; i++ {
		go taskB(ctx, i)
	}

	// Wait for SIGINT.
	sig := make(chan os.Signal, 1)
	signal.Notify(sig, os.Interrupt)
	<-sig

	// Shutdown. Cancel application context will kill all attached tasks.
	cancel()
}